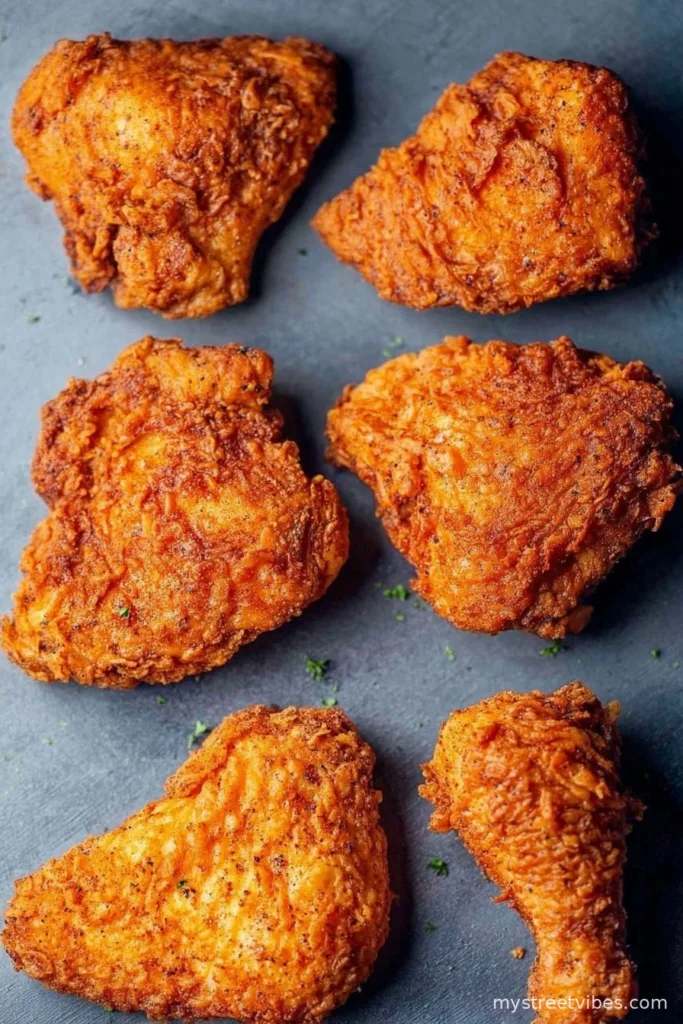
Alright, Let’s Talk Air Fryer Fried Chicken
You know those meals that somehow manage to draw everyone to the kitchen with zero warning? That’s what this Air Fryer Fried Chicken does in my house—it’s basically a siren call for the people who “weren’t hungry.” I remember the first time I made it; it was more out of curiosity (and to avoid the oil splatters my regular fried Chicken always caused), but now it’s the thing my kids ask for when they think I’ve got nothing planned. Funny how that works, right? By the way, I once tried to get all fancy and called it “gourmet,” but honestly, it’s comfort food wearing a new outfit. Oh, and prepare for crumbs everywhere… it’s worth it.

Why I Keep Making This (and You Might Too)
I’ll whip this up on a weeknight when I’m not in the mood for complicated stuff—seriously, no one does a judging side-eye like my teenager when I botch chicken, so this recipe had to be good. My husband says he loves how the crust gets that “fake good-for-you crunch” without deep frying (he’s onto me, but doesn’t mind). And if you’re someone who ever burned a batch (yep, guilty as charged), you’ll appreciate how much harder it is to mess up in the air fryer. I’ll admit, sometimes the breading wants to come off, but I just pretend that’s rustic style.
What You’ll Need (And What I’ll Substitute When I Forget Something)
- 1.5 lbs chicken drumsticks and thighs (or just breasts, or wings—whatever looked good at the shop; bone-in’s best for juicy meat, but boneless works too)
- 1 cup buttermilk (plain yogurt thinned with a splash of milk totally works—my aunt swears by this)
- 2 cups all-purpose flour (sometimes I use half cornstarch if I’m feeling fancy; gluten-free blend also worked that one time I ran out)
- 1 teaspoon paprika (sweet or smoked, I kind of grab whichever is closest—but not chili powder, unless you like it hot!)
- 1 teaspoon garlic powder
- 1 teaspoon onion powder
- 1 teaspoon salt (I sometimes add a pinch more, but shh, don’t tell the sodium police)
- 1 teaspoon black pepper
- 1/2 teaspoon cayenne (optional—my kids protest, but I sneak a little in when I can)
- 1 tablespoon olive oil or spray (you can skip this, but I don’t recommend it for crispiness)
How To Make Air Fryer Fried Chicken (Followed by Rambling)
- Pat your chicken pieces dry with paper towels (trust me, this step matters more than you’d think). Chuck them in a bowl and pour the buttermilk over, making sure everything gets coated. Let this all lounge in the fridge for 1-4 hours if you’ve got time (20 minutes if you don’t—I won’t judge).
- In a large shallow dish, mix flour, paprika, garlic powder, onion powder, salt, pepper, and cayenne (if using). Sometimes I add a little extra paprika for that color, even if nobody notices but me.
- Take the chicken pieces out of their buttermilk bath and let any excess drip off. Dunk each one in the seasoned flour, pressing a bit so it sticks—don’t worry if your hands look like you lost a fight with a bakery. I kinda love it.
- Preheat your air fryer to 380°F (or 190°C) for a few minutes. This is when I usually realize the basket still has last night’s fries crumbs in it.
- Arrange the coated chicken in a single layer in the basket—don’t crowd things or the air won’t do its magic. Sometimes I need to do two batches, which is annoying but also means more crispy bits stuck to the basket for me to snack on.
- Lightly spritz or brush the chicken on all sides with olive oil. Still tastes okay if you forget, but it’s way crispier with it.
- Air fry for about 25 minutes, flipping the pieces halfway through. (This is where I sneak a peek; once I actually forgot to flip and, well, one side looked like a sunbather who fell asleep.) Chicken’s done when it hits 165°F inside—or if you slice in and it’s juicy and perfectly cooked. Juices clear? You’re golden.
Stuff I’ve Figured Out (Most The Hard Way)
- If your flour coating looks patchy, don’t stress. As soon as it cooks, magic happens and it usually evens out.
- Marinating in buttermilk for a few hours really does make it juicier, but I’ve cut corners and nobody noticed… or so I think.
- If you forget to preheat the air fryer, everything still works, just takes a smidge longer.
Things I’ve Tried (That Actually Worked…And Didn’t)
- Tried panko breadcrumbs in the mix—great crunch, but some fell off everywhere. Still tasty.
- Used boneless thighs instead of bone-in—more tender, but less juicy. Go figure.
- Don’t try to coat with just egg and flour—gets weird and gummy. Trust me on this one.

Do You Really Need Fancy Equipment?
Honestly, my air fryer’s not huge and sometimes it’s a bit of a squeeze. I’ve done this with a convection oven on a rack at 425°F and it worked, just took longer. If you don’t have an olive oil spray, a pastry brush gets the job done. And if you have a meat thermometer, use it; otherwise, just do the old cut-and-peek.
How To Store & Reheat (If You Have Any Left…Which Is Rare)
Keep leftovers in an airtight container in the fridge for up to 2 days, though honestly, in my house it never lasts more than a day! Reheat in the air fryer for 5-7 minutes at 350°F to revive that crispiness; the microwave works but gives you sad, floppy skin (not recommended, unless you’re in a hurry).
How I Serve It (And Why My Family Thinks I’m Extra)
I like mine piled on a big plate with homemade coleslaw and waffle fries (crinkle is non-negotiable in our house). Sometimes, if it’s Sunday, we do hot honey drizzle—most weekdays it’s straight-up ketchup for the little ones.
Things I Learned The Hard Way (Pro Tips, Or Whatever)
- Don’t overcrowd the basket—once I did, and it was a soggy mess. Patience pays here.
- I tried skipping the flip halfway through—regretted that because the bottom side just…meh.
- For thicker pieces, add 2-3 extra minutes. I got a little flash of raw once. Not ideal!
Questions I’ve Actually Gotten (And How I Answered)
- Can I use chicken breasts? Yep, I’ve done it. Just slice them into thick strips so they stay juicy & check early for doneness.
- What if I don’t have buttermilk? Milk with a splash of vinegar or even plain yogurt thinned with water does the trick. Once, I just used milk and, surprisingly, still good.
- How do you keep the coating from falling off? Some always falls off for me—probably a sign of homemade charm. But pressing the flour on helps.
- Can I freeze the leftovers? You could, but mine always get eaten before I get the chance, so…I guess that says it all.
So there you go, that’s my go-to Air Fryer Fried Chicken, complete with the little missteps and happy accidents that only make it better. If you try a weird ingredient and it works out, let me know, because my experiments are definitely ongoing (I once tried coconut flour—eh, not my thing, but maybe yours!). Side note: am I the only one who snacks on the extra crispy bits left behind? Honestly, those are almost the best part.
Ingredients
- 1.5 lbs chicken drumsticks and thighs (or just breasts, or wings—whatever looked good at the shop; bone-in’s best for juicy meat, but boneless works too)
- 1 cup buttermilk (plain yogurt thinned with a splash of milk totally works—my aunt swears by this)
- 2 cups all-purpose flour (sometimes I use half cornstarch if I’m feeling fancy; gluten-free blend also worked that one time I ran out)
- 1 teaspoon paprika (sweet or smoked, I kind of grab whichever is closest—but not chili powder, unless you like it hot!)
- 1 teaspoon garlic powder
- 1 teaspoon onion powder
- 1 teaspoon salt (I sometimes add a pinch more, but shh, don’t tell the sodium police)
- 1 teaspoon black pepper
- 1/2 teaspoon cayenne (optional—my kids protest, but I sneak a little in when I can)
- 1 tablespoon olive oil or spray (you can skip this, but I don’t recommend it for crispiness)
Instructions
-
1Pat your chicken pieces dry with paper towels (trust me, this step matters more than you’d think). Chuck them in a bowl and pour the buttermilk over, making sure everything gets coated. Let this all lounge in the fridge for 1-4 hours if you’ve got time (20 minutes if you don’t—I won’t judge).
-
2In a large shallow dish, mix flour, paprika, garlic powder, onion powder, salt, pepper, and cayenne (if using). Sometimes I add a little extra paprika for that color, even if nobody notices but me.
-
3Take the chicken pieces out of their buttermilk bath and let any excess drip off. Dunk each one in the seasoned flour, pressing a bit so it sticks—don’t worry if your hands look like you lost a fight with a bakery. I kinda love it.
-
4Preheat your air fryer to 380°F (or 190°C) for a few minutes. This is when I usually realize the basket still has last night’s fries crumbs in it.
-
5Arrange the coated chicken in a single layer in the basket—don’t crowd things or the air won’t do its magic. Sometimes I need to do two batches, which is annoying but also means more crispy bits stuck to the basket for me to snack on.
-
6Lightly spritz or brush the chicken on all sides with olive oil. Still tastes okay if you forget, but it’s way crispier with it.
-
7Air fry for about 25 minutes, flipping the pieces halfway through. (This is where I sneak a peek; once I actually forgot to flip and, well, one side looked like a sunbather who fell asleep.) Chicken’s done when it hits 165°F inside—or if you slice in and it’s juicy and perfectly cooked. Juices clear? You’re golden.
CLICK FOR NUTRITION INFO
↑
Approximate Information for One Serving
Serving Size:
1 serving
Calories:
390cal
Protein:
29 gg
Fat:
15 gg
Saturated Fat:
0g
Trans Fat:
0g
Cholesterol:
0mg
Sodium:
0mg
Potassium:
0mg
Total Carbs:
34 gg
Fiber:
0g
Sugar:
0g
Net Carbs:
0g
Vitamin A:
0
Vitamin C:
0mg
Calcium:
0mg
Iron:
0mg
Nutrition Disclaimers
Number of total servings shown is approximate. Actual number of servings will depend on your preferred portion sizes.
Nutritional values shown are general guidelines and reflect information for 1 serving using the ingredients listed, not including any optional ingredients. Actual macros may vary slightly depending on specific brands and types of ingredients used.
To determine the weight of one serving, prepare the recipe as instructed. Weigh the finished recipe, then divide the weight of the finished recipe (not including the weight of the container the food is in) by the desired number of servings. Result will be the weight of one serving.
Did you make this recipe?
Please consider Pinning it!