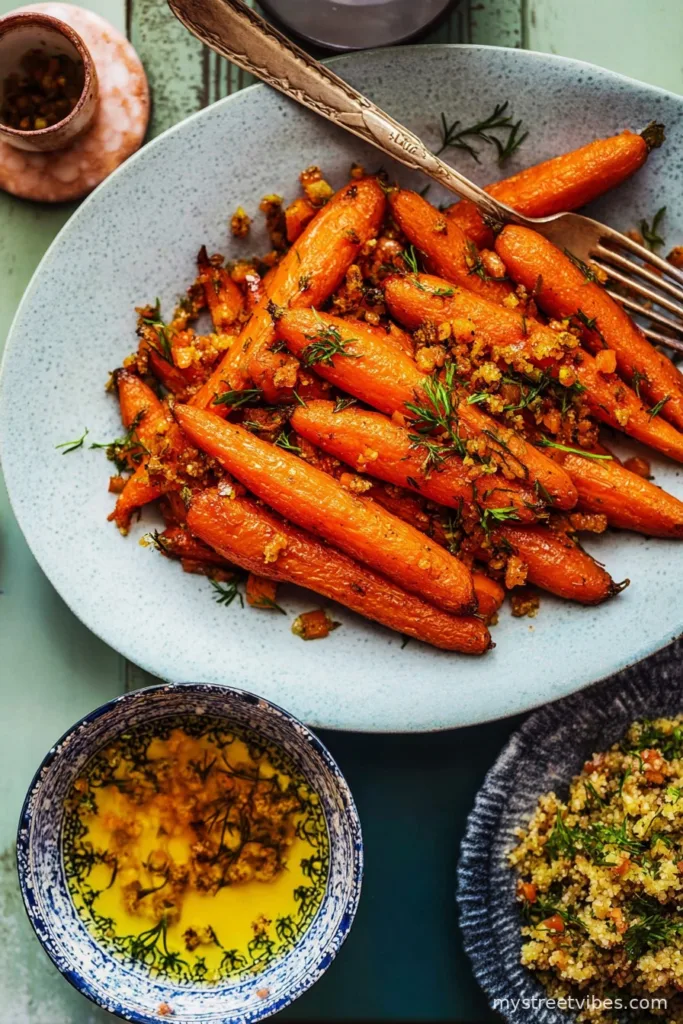
So, About These Air Fryer Carrots…
You know, I never thought I’d be the person to get this excited about carrots (or any orange vegetable for that matter), but here we are. One Sunday night I was staring at a frankly uninspiring bag of carrots in my crisper, wondering if I could, I don’t know… make them not boring? Enter the air fryer, my not-so-secret kitchen weapon. Now, I turn to air fryer carrots whenever I want something healthy-ish that doesn’t taste like cardboard. My younger brother actually asked me for the recipe once, and if you knew his legendary aversion to anything that grew in the ground, you’d be impressed.

Why You’ll Love This (Or, Why I Keep Making It)
I make this whenever I have that “I probably should eat vegetables” urge but don’t feel like fussing over the stove. My family goes wild for these, mostly because they’re crispy at the edges and soft in the middle (not mushy, thank you very much). Also, I’ve burnt carrots more than I’d admit, but—honestly—the air fryer makes that almost impossible. Unless you really try. Which, please don’t.
But wanna know the real magic? You can throw in almost any seasonings that are rattling around the back of your spice cupboard; this is a “use what you’ve got” situation. One time I grabbed cumin by mistake, and… okay, that batch was a bit odd, but my uncle said he liked it. Or he was just being polite.
Gather Your Ingredients (But Don’t Stress)
- About 500g carrots (I usually just grab a handful — if it’s a big handful, that’s fine. Baby carrots work. Heck, I sometimes use those wobbly rainbow ones from the farmer’s market, and those are a whole mood.)
- 1–2 tbsp olive oil (Honestly, sometimes I use whatever oil is closest — avocado oil is lush if you have it.)
- 1 tsp salt (or less, if you’re not a salty person — you do you)
- 1/2 tsp black pepper
- 1/2 tsp garlic powder (my grandmother swore by the fresh stuff, but she’s never met my schedule)
- Optional: 1/2 tsp smoked paprika, dried thyme, or a little honey drizzled after cooking. Sometimes I even toss in a handful of chopped parsley if I’m feeling ‘fancy chef’ vibes.
Okay, Let’s Do This! (A.K.A. Directions)
- Prep your carrots: Peel them or don’t — honestly, sometimes I just scrub ‘em well and slice them into matchsticks or chunky rounds. It’s all good. Just try to get them roughly the same size so they cook together. And if you use baby carrots, save yourself some time and just chuck them in whole.
- Toss with oil and seasoning: This is where I usually sneak a taste. Mix the carrots, oil, salt, pepper, garlic powder, and whatever else you’re adding. Give them a really decent toss. If you’re lazy (like me sometimes), dump them in a zip-top bag and shake it around. Gets the job done with no sticky hands.
- Into the air fryer: 200°C (about 400°F, I think — my air fryer hates me and only has Celsius). Toss the carrots into the basket in a reasonably even layer. Single layer is best so they crisp, but I’ve crowded them before and they survived, just needed a few more minutes.
- Cook ‘em: 15–18 minutes is my sweet spot, but start peeking at 12. Shake the basket halfway through, or just give it a gentle stir. Don’t worry if they look a bit beige at first; they’ll colour up.
- Taste test: This is absolutely essential. Grab one, but careful — those things are lava. Add a pinch more salt if they need it, or zap them another 2–3 minutes for extra crispiness.
- Serve hot: Or at least warm. They firm up a bit as they cool, but they still taste fantastic. Usually they never make it to the table in my house; we eat half straight from the basket. True story.
A Few Notes (Hard-Won Wisdom Included)
- If you cut the carrots too thin, they sort of vanish into crispy nothing, so chunkier is better. Ask me how I know.
- Yes, you really do want to shake the basket halfway. Skipping this step leads to uneven browning — which, fine, isn’t a crisis, but it bugs me.
- I’ve tried using maple syrup instead of honey, and… actually, on second thought, it wasn’t too bad. More Canadian than my usual batch.
The “Oops, I Experimented” Section (Variations)
- Toss in grated parmesan at the end for a cheesy crust. I tried to add it before once and it glued itself to the air fryer basket. Big mistake.
- A dash of chili flakes or smoked paprika gives it a little kick, which is fun for adults… less so for my spice-averse nephew.
- One time I tried balsamic vinegar pre-cooking. That was a soggy mess, so drizzle after (trust me).

Do You Need Fancy Equipment?
All you really need is an air fryer. Mine’s just your standard countertop type — nothing high-falutin’ here. If you don’t have one, you could roast these in a super hot oven, but it takes longer and won’t crisp quite the same. Also, tongs are handy, but honestly, a big spoon’s fine if that’s all you’ve got. Improvise, that’s half the fun!
What About Leftovers & Storage? (Real Talk)
Stick any leftovers (on the rare occasion there are any) in an airtight container in the fridge. They’ll stay decent for two or three days, though honestly, in my house they vanish within 24 hours, tops. Actually, I think these air fryer carrots taste even better cold the next day, but that might just be me and my weird snack habits.
How Do You Serve Them?
We eat these as a side with almost anything — roast chicken, burgers (yes, really), or piled on top of a grain bowl. My cousin likes them sprinkled with feta, which isn’t traditional but is oddly great. Sometimes I just snack on them with a little pot of hummus. That’s lunch sorted.
Pro Tips? (The Hard Way, of Course)
- I once tried cramming in an extra layer to save time — don’t. They steamed instead of crisping, so I ended up with a pile of limp carrots. Yuck.
- Real talk: skip parchment paper. One time it flew up and nearly started a fire. Experience, not instructions, talking here.
- Season after cooking again if you want that zingy finish. The salt sticks better, I swear.
FAQ: Stuff I’ve Actually Been Asked
- Can I make these with frozen carrots? Yep, but they need a couple more minutes and don’t get as crisp. Still good, though — better than I expected the first time I tried in a pinch.
- Do I have to peel the carrots? Nah, as long as they’re scrubbed. The skin gets a bit wrinkly but adds to the charm, I think.
- Why are my carrots not browning? Could be too much oil, or maybe the basket’s crowded. Just spread ‘em out. Or crank the heat a smidge.
- Is honey really necessary? Nope, skip it if you want totally savoury vibes. Sometimes I forget it entirely and nobody notices.
- Can I prep these ahead? Actually, yes! But they’re best fresh. If you do reheat, pop them back in the air fryer for a few mins — microwave makes them a bit depressing.
And there you have it — air fryer carrots, the side dish that somehow makes me feel like I’ve got my life together. Or at least my veg quota. Give it a go and tell me if your family eats them all straight from the basket, too…
Ingredients
- 1 pound carrots, peeled and cut into sticks
- 1 tablespoon olive oil
- 1/2 teaspoon salt
- 1/4 teaspoon black pepper
- 1/2 teaspoon garlic powder
- 1/2 teaspoon dried thyme
- 1/4 teaspoon paprika
- 1 tablespoon chopped fresh parsley (optional, for garnish)
Instructions
-
1Preheat the air fryer to 380°F (193°C) for 3 minutes.
-
2In a large bowl, toss the carrot sticks with olive oil, salt, black pepper, garlic powder, thyme, and paprika until evenly coated.
-
3Place the seasoned carrots in a single layer in the air fryer basket.
-
4Air fry for 12–15 minutes, shaking the basket halfway through, until carrots are tender and slightly crispy on the edges.
-
5Transfer the carrots to a serving plate, sprinkle with fresh parsley if desired, and serve warm.
CLICK FOR NUTRITION INFO
↑
Approximate Information for One Serving
Serving Size:
1 serving
Calories:
68 caloriescal
Protein:
1.0 gg
Fat:
3.5 gg
Saturated Fat:
0g
Trans Fat:
0g
Cholesterol:
0mg
Sodium:
0mg
Potassium:
0mg
Total Carbs:
9.3 gg
Fiber:
0g
Sugar:
0g
Net Carbs:
0g
Vitamin A:
0
Vitamin C:
0mg
Calcium:
0mg
Iron:
0mg
Nutrition Disclaimers
Number of total servings shown is approximate. Actual number of servings will depend on your preferred portion sizes.
Nutritional values shown are general guidelines and reflect information for 1 serving using the ingredients listed, not including any optional ingredients. Actual macros may vary slightly depending on specific brands and types of ingredients used.
To determine the weight of one serving, prepare the recipe as instructed. Weigh the finished recipe, then divide the weight of the finished recipe (not including the weight of the container the food is in) by the desired number of servings. Result will be the weight of one serving.
Did you make this recipe?
Please consider Pinning it!!