Let Me Tell You About These Brussel Sprouts…
Okay, full disclosure: If you told childhood me I’d be raving about brussel sprouts, I’d have probably pulled a face straight out of a cartoon. But things change (especially my tastebuds) and somewhere along the way—probably after eating one too many questionable Thanksgiving vegetables—I discovered this roasted, glazed version that actually made me crave them. No joke. My cousin Jake still jokes that I put balsamic on everything, which isn’t, uh, wrong.
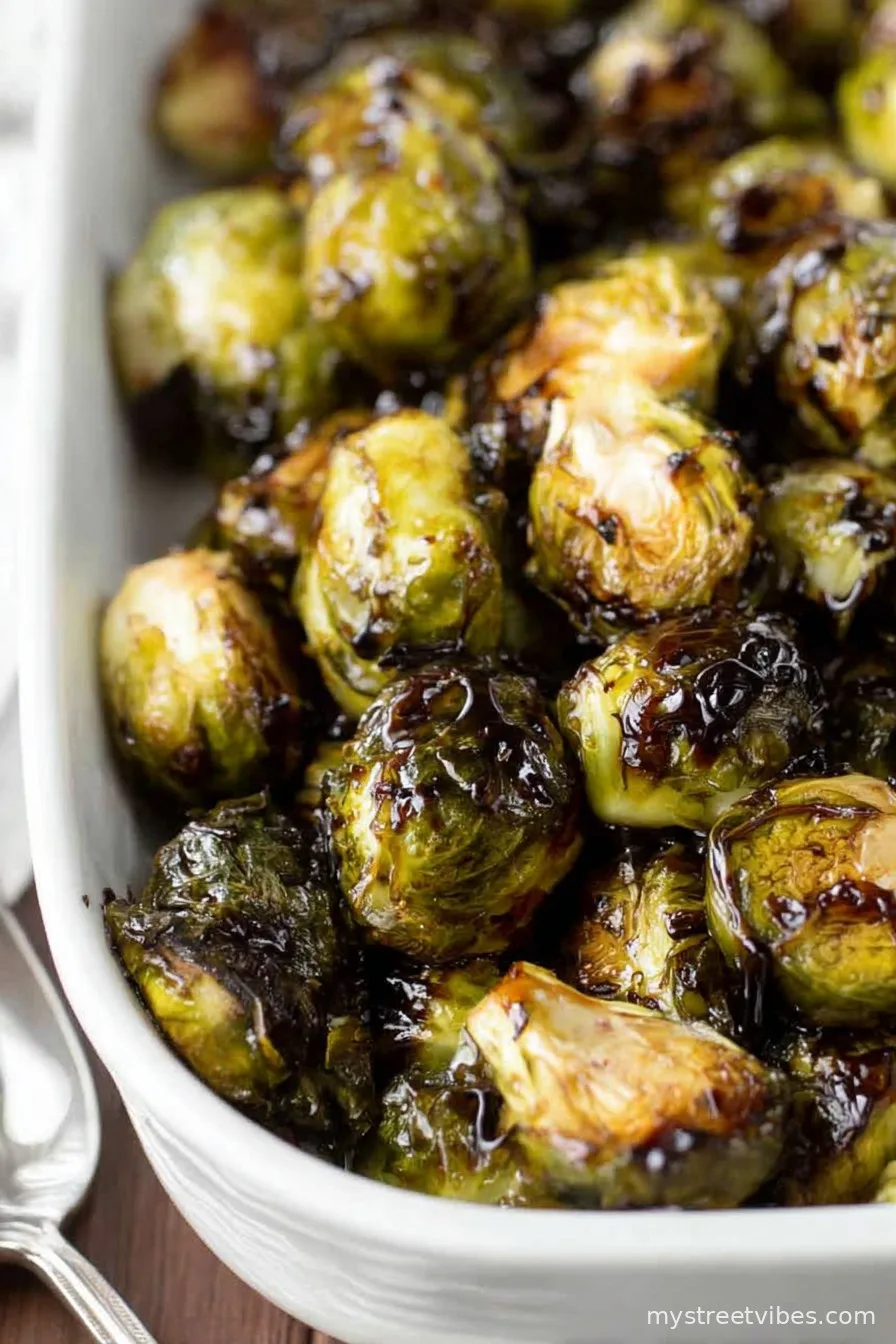
If you associate brussel sprouts with mushy, slightly sulphur-y blobs, just… trust me, this isn’t one of those recipes. The balsamic glaze gets all sticky and a little tangy-sweet; when it meets the crispy-edged sprouts, it’s basically Brussels converted 101. I’ve lost track of how often I’ve made these, but let’s just say I’ve eaten more crispy leaves than I care to admit. Once I even ate the leftovers cold, straight from the fridge… which is another story entirely.
Why You’ll Love Making These (Well, I Do!)
- I drag these out for every ‘potluck or panic’ situation because they’re simple, but everyone acts like you secretly trained in Paris. (Please, keep up this illusion for my ego’s sake.)
- My family basically fights over the crispy bits. Sometimes, I’ll double the batch just for that.
- Honestly, the only real hassle is trimming the sprouts, and even then, it goes pretty quick (put on a playlist and zone out—it helps).
- That moment when you pour the glaze on—magical, but also a tiny bit messy. Wear an apron, learned that the hard way.
What You’ll Need (A Little Room for Freestyle)
- 1 1/2 pounds brussel sprouts, trimmed and halved (I’ve used frozen in a pinch, just thaw and pat dry—they still get decent, not quite as crispy, but works!)
- 2 tablespoons olive oil (I’ve swapped in avocado oil if I’m oddly out)
- 3/4 teaspoon kosher salt—my grandmother swore by Maldon, but regular table salt’s fine
- 1/2 teaspoon black pepper, or slightly more if you’re feeling feisty
- 2 tablespoons balsamic vinegar (don’t worry about the fanciest bottle; I’ve even used the grocery brand)
- 1 tablespoon maple syrup (or honey—my friend Tara uses brown sugar when she’s out of both and it totally works)
- 1 clove garlic, minced (Sometimes I skip—no one protests, but I like the bite; garlic powder works if you’re stuck)
- Optional: pinch of crushed red pepper if you like a tiny bit of heat
How To Actually Make Balsamic Glazed Roasted Brussel Sprouts
- Preheat your oven to 425°F (220°C). I know, it feels excessive, but the heat’s crucial for crispiness.
- Trim those sprouts: Lop off the dry stem ends, peel any sad-looking outer leaves, and halve the big ones. (Sometimes mine get wonky shapes. Who cares?)
- Toss the sprouts on a big baking sheet—use parchment if you like easier cleanup. Drizzle with olive oil, sprinkle on salt and pepper, and toss again so everyone’s coated (I use my hands, but tongs work. Live a little.)
- Arrange sprouts cut-side down. Don’t obsess if some flip over—just means you’ll get a few extra crispy leaves for yourself later.
- Roast for 20 to 25 minutes. At about 15 minutes, I poke around and flip the unhappy stragglers. If they look dark, that’s perfect (but not incinerated—been there).
- While those roast, whisk together balsamic vinegar, maple syrup, and minced garlic in a small bowl. Toss in red pepper flakes if you’re feeling wild. This is usually when I sneak a taste—just to “check the balance.”
- Pour the glaze over the roasted sprouts (sometimes I do a drizzle, other times I go wild—no wrong answers, really) and toss everything together. Pop the pan back in for 3-4 minutes until things get sticky and caramelized.
- Give them a taste. Add a bit more salt or pepper if you like. And—if you’re like me—scoop a few crispy leaves off the tray before anyone else spots them.

Real-Life Notes (Yes, I Messed This Up Too)
- Don’t crowd the pan, or everything steams instead of crisping. I once crammed two pounds onto a baking sheet and got brussel mush. You’ve been warned.
- I’ve under-glazed before (thought I was “being good”); honestly, go for the full amount, or it’s just not the same.
- The glaze smells a bit sharp at first, but I swear it mellows beautifully after roasting. The first time, I almost bailed—so glad I stuck it out.
If You Wanna Change It Up (Trial and Error Tales)
- I once swapped the maple for pomegranate molasses—nice idea in theory, but it was too tangy for my lot.
- Parmesan: Shake some over right before serving. Cheesy, salty, and pretty much always a hit in my house.
- Chopped pecans or walnuts: Toss ’em in the last few minutes. Adds crunch and, if you catch them just toasty enough, they’re magic (just don’t burn them—I did once and nearly smoked out the kitchen).
- A sprinkle of lemon zest on top is just the thing when I want a fresher vibe (I forget sometimes but it’s good!).

The Gear (And What to Do If You Don’t Have It)
I’d say a rimmed baking sheet is ideal (because otherwise you’re chasing runaway sprouts, which is not a fun game). Don’t have parchment? Grease that tray with a dab of oil—no biggie. I use a mixing bowl for tossing, but in a pinch, a big plastic bag works. Measuring spoons? As long as you’re close, “a splash” and “a drizzle” usually do the trick—if you don’t overthink it.
Let’s Talk Leftovers (If Any Survive)
Straight talk: These are at their absolute best fresh, but if (and that’s a big if) you have leftovers, they’ll keep in a sealed container in the fridge for up to three days. I have, on occasion, tossed leftovers on a salad cold, and maybe—okay, more than maybe—they tasted even better the day after. They do lose some of the crunch, just so you know. In my house, it’s rare that they last more than a day!
How We Serve ‘Em at My Place
Sometimes I serve these as a “pre-dinner snack” straight off the pan (no shame). They’re fantastic with roast chicken, or honestly, a bowl of plain pasta and these on the side is low-key luxury when I’m tired. My partner’s a fan of pairing them with steak, and once, we just ate them out of the bowl watching telly. Not traditional, but who is?
A Few Hard-Learned Lessons (So You Don’t Have To…)
- I tried rushing the roast at a lower temp. You end up with limp, steamed sprouts. Just… don’t. The hot oven is non-negotiable, trust me.
- Let the glaze bubble in the last minutes. Don’t be afraid—it looks intense, but it’s the difference between ‘meh’ and ‘wow.’
- If you want those edges super crisp, let your sprouts dry well before roasting. I’m sometimes impatient—that’s when things get soggy.
FAQ—Answering the Odd Questions I Get
- Can I use frozen brussel sprouts?
- Yup! Just thaw and pat them as dry as you can. They don’t get quite as crispy, but they’ll still taste grand (especially with extra glaze).
- Is it possible to make this ahead?
- Sort of. You can trim and toss the sprouts in oil earlier, but honestly, roast them fresh for best texture. The glaze can be made in advance, though.
- What’s the point of cutting them in half?
- You’ll get way more crispy surface area! Some folks skip this, but I reckon it’s worth the extra 2 minutes.
- Can I skip the maple syrup?
- Well, technically, but I think the sweet-tangy combo is the whole spirit of this dish. Try honey or brown sugar if you have it. Leave it out if you must—it’ll still work, but I might look at you funny.
Okay, that’s probably more brussel sprout chatter than you bargained for. But if you love a recipe with a bit of bite, a little sweetness, and real personality, give these a try—and let me know if you discover a better version (just don’t tell my cousin Jake, or I’ll never live it down).
Ingredients
- 1 1/2 pounds brussel sprouts, trimmed and halved (I’ve used frozen in a pinch, just thaw and pat dry—they still get decent, not quite as crispy, but works!)
- 2 tablespoons olive oil (I’ve swapped in avocado oil if I’m oddly out)
- 3/4 teaspoon kosher salt—my grandmother swore by Maldon, but regular table salt’s fine
- 1/2 teaspoon black pepper, or slightly more if you’re feeling feisty
- 2 tablespoons balsamic vinegar (don’t worry about the fanciest bottle; I’ve even used the grocery brand)
- 1 tablespoon maple syrup (or honey—my friend Tara uses brown sugar when she’s out of both and it totally works)
- 1 clove garlic, minced (Sometimes I skip—no one protests, but I like the bite; garlic powder works if you’re stuck)
- Optional: pinch of crushed red pepper if you like a tiny bit of heat
Instructions
-
1Preheat your oven to 425°F (220°C). I know, it feels excessive, but the heat’s crucial for crispiness.
-
2Trim those sprouts: Lop off the dry stem ends, peel any sad-looking outer leaves, and halve the big ones. (Sometimes mine get wonky shapes. Who cares?)
-
3Toss the sprouts on a big baking sheet—use parchment if you like easier cleanup. Drizzle with olive oil, sprinkle on salt and pepper, and toss again so everyone’s coated (I use my hands, but tongs work. Live a little.)
-
4Arrange sprouts cut-side down. Don’t obsess if some flip over—just means you’ll get a few extra crispy leaves for yourself later.
-
5Roast for 20 to 25 minutes. At about 15 minutes, I poke around and flip the unhappy stragglers. If they look dark, that’s perfect (but not incinerated—been there).
-
6While those roast, whisk together balsamic vinegar, maple syrup, and minced garlic in a small bowl. Toss in red pepper flakes if you’re feeling wild. This is usually when I sneak a taste—just to “check the balance.”
-
7Pour the glaze over the roasted sprouts (sometimes I do a drizzle, other times I go wild—no wrong answers, really) and toss everything together. Pop the pan back in for 3-4 minutes until things get sticky and caramelized.
-
8Give them a taste. Add a bit more salt or pepper if you like. And—if you’re like me—scoop a few crispy leaves off the tray before anyone else spots them.
CLICK FOR NUTRITION INFO
↑
Approximate Information for One Serving
Serving Size:
1 serving
Calories:
135 caloriescal
Protein:
4gg
Fat:
7gg
Saturated Fat:
0g
Trans Fat:
0g
Cholesterol:
0mg
Sodium:
0mg
Potassium:
0mg
Total Carbs:
18gg
Fiber:
0g
Sugar:
0g
Net Carbs:
0g
Vitamin A:
0
Vitamin C:
0mg
Calcium:
0mg
Iron:
0mg
Nutrition Disclaimers
Number of total servings shown is approximate. Actual number of servings will depend on your preferred portion sizes.
Nutritional values shown are general guidelines and reflect information for 1 serving using the ingredients listed, not including any optional ingredients. Actual macros may vary slightly depending on specific brands and types of ingredients used.
To determine the weight of one serving, prepare the recipe as instructed. Weigh the finished recipe, then divide the weight of the finished recipe (not including the weight of the container the food is in) by the desired number of servings. Result will be the weight of one serving.
Did you make this recipe?
Please consider Pinning it!