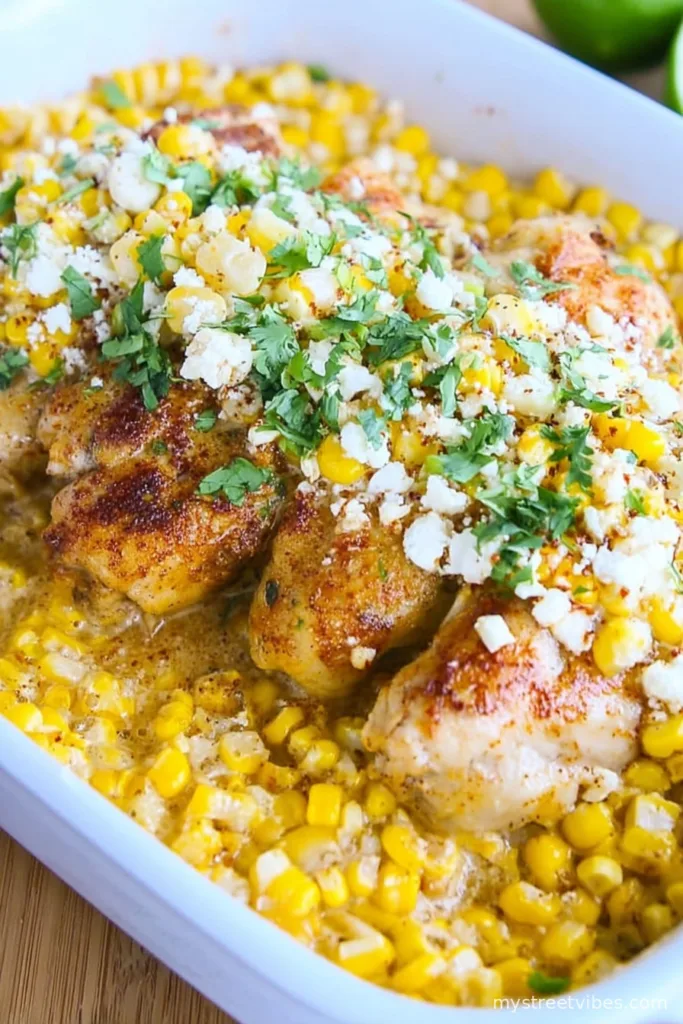
Okay, so let me just say: the first time I made Mexican Street Corn Chicken, I was convinced it was going to be a Pinterest fail. You know that feeling where you think, “oh, this is simple—I’ll just toss a little of this, a bit of that,” and then somewhere along the way you realize your kitchen looks like you hosted a food fight? Yeah, that was me. But it turned out, the mess was one hundred percent worth it, and I still make this when I want something that’s both impressive (ish) and actually foolproof—even if you have a toddler yanking on your pant leg. Plus, it’s got that combo of creamy, tangy, cheesy that always makes my family lose their minds. Well, except my cousin Dave; he removes all the cilantro like it’s poison. Legends only, right?

Why You’ll Love This (or, Why I Keep Making It Even When I Swear I Won’t)
I whip this up when I want to get a bit of summer on the table, no matter how grim the weather is outside. Honestly, my crew is obsessed with it because you’ve got all the best things about elotes, but somehow made into a full-on meal. (Also, fewer toothpicks required.) Sure, the corn tends to go everywhere, and there’s always that moment when I wonder if the sauce is too much—but it’s never too much. The chicken comes out juicy, and the topping? Let’s just say I’d eat it with a spoon if no one was watching. I make this when I’ve got leftover grilled corn, but I’ll use frozen too; nobody’s ever noticed. Except for my mom, but she’s got the palate of a bloodhound.
Here’s What You’ll Need (Or Substitute, Because Who’s Perfect?)
- 2 medium chicken breasts (sliced in half if they’re thicc; I sometimes swap thighs—way juicier honestly)
- 1 tablespoon olive oil (or whatever oil you grab first—I’ve used avocado oil in a pinch; works fine)
- 1 teaspoon chili powder (sometimes I raid the spice drawer and it’s smoked paprika instead—no judgement)
- 1/2 teaspoon cumin
- Salt & black pepper, to taste (confession: I rarely measure this exactly)
- 1 1/2 cups corn kernels (fresh, frozen, or canned, seriously it’s all good; grandmother swore by fresh)
- 1/3 cup mayonnaise (Duke’s if you can, otherwise whatever’s hiding in your fridge; Greek yogurt swaps in just fine)
- 1/4 cup sour cream (sometimes skip if I’m running low, just add more mayo/yogurt)
- Juice of 1 lime (but bottled stuff in a hurry, nobody died yet)
- 1/2 cup crumbled cotija cheese (feta is definitely not traditional, but I’ve used it, sue me)
- 1/3 cup chopped fresh cilantro (if you’re a cilantro hater, skip it or use parsley, but why?)
- 1/2 small red onion, diced (I’ve used green onions when I can’t face another onion dice)
- 1 clove garlic, minced
- Pinch of cayenne (only if you like a little kick; it’s optional, promise!)
Here’s How I Actually Make It
- Preheat your oven to 425°F (220°C), or just set it really hot. If you’ve got an air fryer, it works too, just reduce the time a bit. I’ve bungled the temp before and it still came out edible, so don’t sweat it.
- Pat the chicken dry with paper towels—this helps the seasonings stick (I sometimes forget, honestly, but it still works out). Rub both sides with olive oil then dust with chili powder, cumin, salt, and pepper. Trust your eyeballs here; a little more never hurt.
- Lay the chicken on a baking tray (I use foil for less washing-up—highly recommend). Pop it in the oven for about 18-22 minutes, or until it’s cooked through but still juicy. Depending on the thickness, you might need a smidge more or less. This is where I usually sneak a tiny piece (safely!) to check. Or, just poke it and see if the juices run clear.
- While the chicken cooks, grab a big bowl and mix together the mayo, sour cream, lime juice, garlic, a pinch of cayenne, most of the cheese, and half the cilantro. Give it a taste—sometimes I add extra lime at this point. Toss in your corn and red onion, stir it all up. Don’t worry if it looks messy, that’s a good thing.
- When the chicken’s done, let it rest for maybe five minutes—if you can wait. Then pile that corn mixture generously over the top. Sprinkle over the rest of the cotija and cilantro. If you’re feeling fancy, a wedge of lime on the side never hurts.
- Serve straight away before anyone sneaks all the topping!
Notes (AKA: What I Learned the Hard Way)
- I once tried using shredded cheddar—honestly, stick to cotija if you can, but feta sorta works. Cheddar, not so much.
- If you’re grilling corn, char it well—it tastes way better. But don’t overthink it; frozen is fine too.
- I tend to go heavier on the lime than most recipes. It’s just better that way, in my humble opinion.
Been There, Tried That: Variations
- I swapped the chicken for tofu once—my veggie friend was happy, but honestly, it fell apart. Use extra oil if you try this.
- Pulled pork instead of chicken is AMAZING—probably my favorite “happy accident.”
- Roasted poblanos in the corn mix = so good.
- Once I tried drizzling with hot honey. It was…weird. Maybe skip that one unless you’re feeling bold.

Do You Really Need All the Equipment?
You just need a baking tray and a mixing bowl. But if you only have a skillet, just sear the chicken on the stove—adds a nice flavor actually. No microplane for your garlic? Just smash and chop it fine, doesn’t need to be fancy.
Storage: How Long Does This Last (Or…Does It?)
If you somehow have leftovers, store them in the fridge for up to 3 days, but honestly, in my house it never lasts more than a day! Sometimes the sauce soaks in overnight and I kind of love it even more the next day, but the corn topping is best fresh.
How I Like to Serve This (With a Side of Family Traditions)
Honestly, we just slap this right over a big bed of chopped romaine for a sort of salad situation, add a mountain of tortilla chips, and call it dinner. Or, my little nephew insists on rolling it up in a warm tortilla—who am I to argue?
Hard-Won Pro Tips
- I’ve rushed the step where you let the chicken rest—don’t do it. It dries out if you slice too soon.
- If your corn isn’t charred enough, just toss it in a dry skillet until a bit smoky. You’ll thank yourself later.
- Actually, reserving a little extra sauce to drizzle over makes everything better—learned that the messy way.
FAQ (Because Friends Actually Ask… A Lot!)
- Can I make this with rotisserie chicken? Sure can. Just warm it through and pile on the topping! So easy it’s not even fair.
- Is there a way to make this dairy-free? Definitely. Use vegan mayo/yogurt, skip the cheese or use a plant-based one—tastes surprisingly good, but I’d add lots more lime and spices for “zing.”
- Can you grill the chicken? Oh absolutely—tastes even better, actually. Just be careful it doesn’t dry out on the BBQ.
- What about making ahead? You can mix the corn topping hours ahead (even the night before), but only put it on the chicken right before serving so it stays fresh.
- Why is my sauce runny? Might just be too much lime—or didn’t drain canned corn well enough. I say just embrace it; grab a spoon!
Oh! Before I forget, the last time I made this, I accidentally doubled the garlic. Nobody complained, but the dog kept his distance. (He came back for the cheese though, obviously.) Anyway, let me know how this goes for you—it’s messy, cheesy, just a little wild, and honestly, it’s now my go-to for cheering up a weekday. Enjoy!
Ingredients
- 2 medium chicken breasts (sliced in half if they’re thicc; I sometimes swap thighs—way juicier honestly)
- 1 tablespoon olive oil (or whatever oil you grab first—I’ve used avocado oil in a pinch; works fine)
- 1 teaspoon chili powder (sometimes I raid the spice drawer and it’s smoked paprika instead—no judgement)
- 1/2 teaspoon cumin
- Salt & black pepper, to taste (confession: I rarely measure this exactly)
- 1 1/2 cups corn kernels (fresh, frozen, or canned, seriously it’s all good; grandmother swore by fresh)
- 1/3 cup mayonnaise (Duke’s if you can, otherwise whatever’s hiding in your fridge; Greek yogurt swaps in just fine)
- 1/4 cup sour cream (sometimes skip if I’m running low, just add more mayo/yogurt)
- Juice of 1 lime (but bottled stuff in a hurry, nobody died yet)
- 1/2 cup crumbled cotija cheese (feta is definitely not traditional, but I’ve used it, sue me)
- 1/3 cup chopped fresh cilantro (if you’re a cilantro hater, skip it or use parsley, but why?)
- 1/2 small red onion, diced (I’ve used green onions when I can’t face another onion dice)
- 1 clove garlic, minced
- Pinch of cayenne (only if you like a little kick; it’s optional, promise!)
Instructions
-
1Preheat your oven to 425°F (220°C), or just set it really hot. If you’ve got an air fryer, it works too, just reduce the time a bit. I’ve bungled the temp before and it still came out edible, so don’t sweat it.
-
2Pat the chicken dry with paper towels—this helps the seasonings stick (I sometimes forget, honestly, but it still works out). Rub both sides with olive oil then dust with chili powder, cumin, salt, and pepper. Trust your eyeballs here; a little more never hurt.
-
3Lay the chicken on a baking tray (I use foil for less washing-up—highly recommend). Pop it in the oven for about 18-22 minutes, or until it’s cooked through but still juicy. Depending on the thickness, you might need a smidge more or less. This is where I usually sneak a tiny piece (safely!) to check. Or, just poke it and see if the juices run clear.
-
4While the chicken cooks, grab a big bowl and mix together the mayo, sour cream, lime juice, garlic, a pinch of cayenne, most of the cheese, and half the cilantro. Give it a taste—sometimes I add extra lime at this point. Toss in your corn and red onion, stir it all up. Don’t worry if it looks messy, that’s a good thing.
-
5When the chicken’s done, let it rest for maybe five minutes—if you can wait. Then pile that corn mixture generously over the top. Sprinkle over the rest of the cotija and cilantro. If you’re feeling fancy, a wedge of lime on the side never hurts.
-
6Serve straight away before anyone sneaks all the topping!
CLICK FOR NUTRITION INFO
↑
Approximate Information for One Serving
Serving Size:
1 serving
Calories:
420 caloriescal
Protein:
31gg
Fat:
26gg
Saturated Fat:
0g
Trans Fat:
0g
Cholesterol:
0mg
Sodium:
0mg
Potassium:
0mg
Total Carbs:
19gg
Fiber:
0g
Sugar:
0g
Net Carbs:
0g
Vitamin A:
0
Vitamin C:
0mg
Calcium:
0mg
Iron:
0mg
Nutrition Disclaimers
Number of total servings shown is approximate. Actual number of servings will depend on your preferred portion sizes.
Nutritional values shown are general guidelines and reflect information for 1 serving using the ingredients listed, not including any optional ingredients. Actual macros may vary slightly depending on specific brands and types of ingredients used.
To determine the weight of one serving, prepare the recipe as instructed. Weigh the finished recipe, then divide the weight of the finished recipe (not including the weight of the container the food is in) by the desired number of servings. Result will be the weight of one serving.
Did you make this recipe?
Please consider Pinning it!