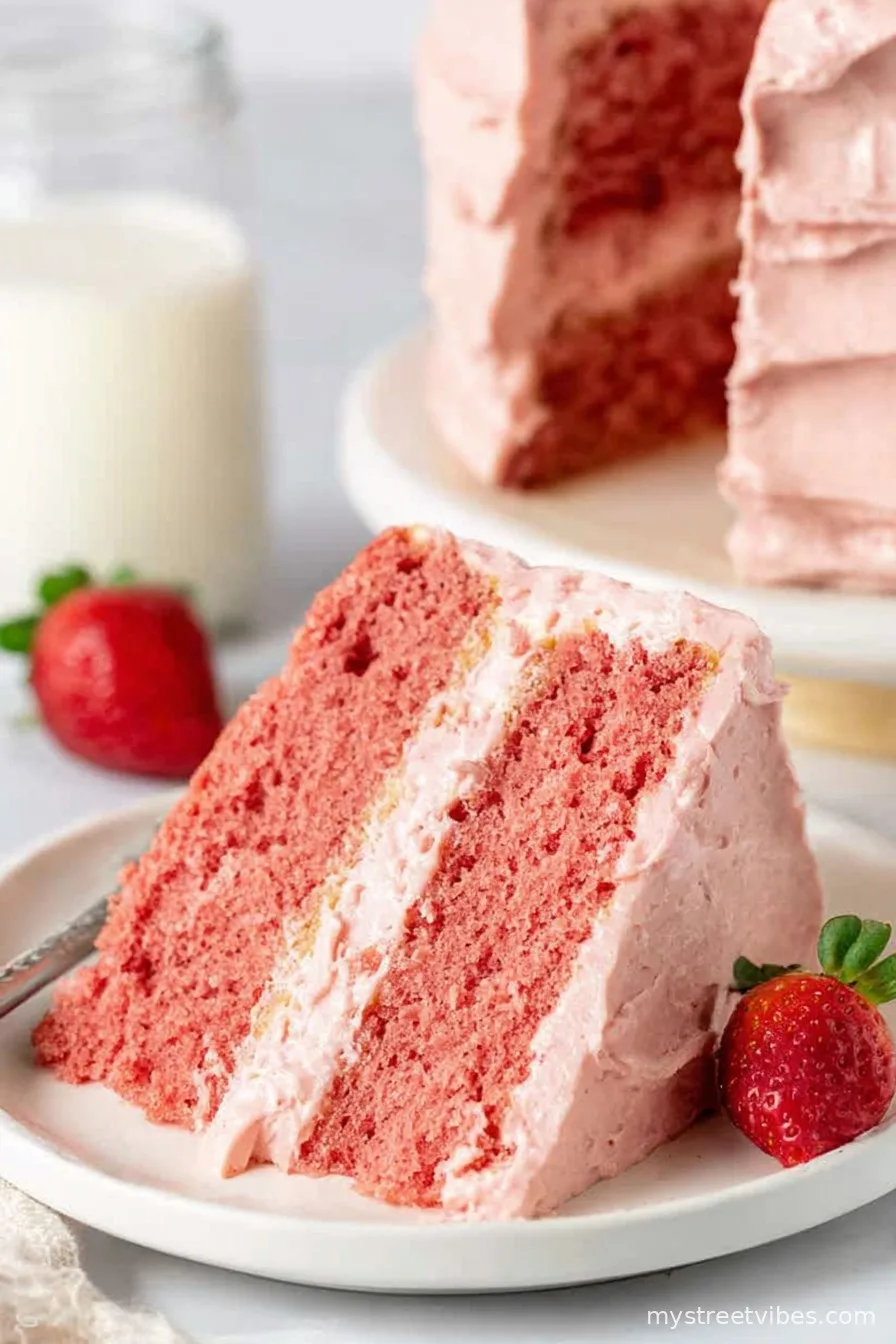
You know, every time strawberry season rolls around, I basically become a strawberry hoarder. The local market guy—Barry, who always slips me the ripest ones—once asked me if I was opening a fruit shop. Anyway, there’s just something about summer strawberries that goes straight to my head. This strawberry layer cake is my way of showing off the best of the berries; it’s become the cake I make when my family “subtly” starts dropping hints about craving something sweet. (They’re not subtle, by the way—it’s always, “So, when are you making that cake again?”)
Why You’ll Love This Strawberry Cake (Or At Least I Do!)
I usually bake this whenever I want to win points with my family, or I just need a dose of nostalgia. My kids inhale it faster than I can hide the last slice. And, honestly, I’ve ruined a few cakes in my day (forgot the sugar once—still got eaten with extra jam!), but this one? It’s reliably lush, moist, and jammy. (Plus, it’s forgiving. Even when my layers come out lopsided, a bit of whipped cream covers a multitude of sins.)
What You’ll Need (Swaps Welcome!)
- 2 cups all-purpose flour (sometimes I swap in ½ cup almond flour for a little extra flavor—don’t tell my grandma)
- 1 ¼ cups granulated sugar
- 2 ½ teaspoons baking powder (I once used self-raising flour and skipped this, but it was a bit dense… your call)
- ½ teaspoon salt (kosher, regular table salt, whatever’s handy)
- ½ cup unsalted butter, softened (salted works fine if that’s all you’ve got—just dial down the extra salt)
- ¼ cup vegetable oil (or melted coconut oil for a warmer flavor, though it makes the cake ever so slightly heavier)
- 4 large eggs, room temperature—ish
- ⅔ cup whole milk (I’ve used oat milk in a pinch, turned out well!)
- 2 teaspoons vanilla extract (honestly, I eyeball it sometimes)
- 1 ½ cups fresh strawberries, hulled and chopped (frozen works, but thaw them and pat them dry first—seriously, or you’ll have strawberry soup)
- 1 cup heavy whipping cream
- 2 tablespoons powdered sugar
- Additional sliced strawberries for layering and decorating
Let’s Build This Strawberry Layer Cake
- Preheat your oven to 350°F (180°C). Grab two 8-inch round cake pans—if you’ve only got one, you can bake one layer after the other; I’ve done it more times than I can admit. Line the bottoms with parchment paper and lightly grease the sides (I just smear on some butter with my fingers).
- In a big ol’ bowl, whisk together the flour, sugar, baking powder, and salt. No fancy stand mixer needed here—I usually just use a trusty whisk or a wooden spoon (the one with the slightly cracked handle that I swear makes everything taste better).
- Add the softened butter and oil to the dry mix and blend until it’s kind of sandy and pebbly—don’t panic, it’ll come together. Stir in the eggs, milk, and vanilla until you’ve got a thick but pourable batter.
- Gently fold in the chopped strawberries. Try not to squish them too much—if a few get mushed, it’s absolutely fine. This is the bit where it looks a little too pink, like cartoon cake, but don’t worry—it bakes out nicely.
- Divide the batter between your pans (as evenly as you can eyeball, no judgment). Bake for 24–28 minutes, but start checking at 22, because my oven lies about temperatures and maybe yours does too. When a toothpick comes out with just a crumb or two, you’re golden. Let the cakes cool in the pans for 10 minutes, then turn them out onto racks to cool completely. Don’t rush this part or the cream will melt (ask me how I know).
- While the cakes cool, whip the cream and powdered sugar together until you’ve got soft peaks—not butter, not soup, just pleasantly cloud-like.
- Assembly time! Place one cake layer on your favorite plate. Pile on a generous blob of whipped cream, scatter a handful of sliced strawberries on top, then lovingly plop the second layer over that. Repeat with more cream and berries. Sometimes I sprinkle a bit of extra sugar on top if the strawberries aren’t as sweet as I’d hoped.

Notes (From the School of Hard Cake Knocks)
- If your cake sticks, just patch it up with extra cream. Nobody minds, honest.
- Strawberries sometimes turn the batter a little greyish if overmixed—doesn’t affect the taste one bit.
- I’ve tried using a hand blender for the cream; lets just say it became butter faster than you’d think.
Variations I’ve Tried (Some Good, Some Eh…)
- Adding a layer of lemon curd between the cakes—amazing, if you like a tangy twist.
- Swapping the strawberries for raspberries—works great, but you’ll want a touch more sugar.
- Once tried with chocolate whipped cream. Tasted fine, but felt a bit odd with strawberries—it’s like wearing socks with sandals. Make of that what you will!

What You’ll Need From The Cupboard (Equipment)
- 2 round cake pans (8-inch is best, but I’ve crammed batter into one 9-inch and it survived)
- A whisk or an electric hand mixer (I even tried a fork once—never again, trust me)
- Parchment paper—if not, butter and flour the pans really well, but parchment wins every time
- Cooling rack (or just your stovetop burners, that’s what I usually do)
- Big mixing bowl, and a medium/smallish one for the cream
Can I admit something not directly related to cake? I once got distracted mid-bake because my neighbor’s dog, Pickles, was barking so much I thought maybe he’d learned to sing. Turns out, just chasing his own tail. A reminder, perhaps, that distractions are just part of home baking.
How to Store Your Strawberry Layer Cake (Ha—Like There’ll Be Leftovers)
If you do have leftovers, pop the cake in an airtight container in the fridge. It’ll stay good for about 2 days, but the strawberries can start looking a little tired after the first. Honestly, in our house, it’s usually just crumbs by sunset.
How I Like To Serve It (And You Might Too)
Best on a faded old cake stand with a big mug of tea—bonus points for a drizzle of strawberry syrup over each slice. My youngest insists on a candle, even when it’s not her birthday. Makes any day a little celebration.
Things I Learned the Hard Way (Pro Tips)
- Don’t try slicing warm cakes—it’s a gooey mess. I once did, and, well, let’s call it a trifle instead.
- Actually, the cake tastes even better after sitting in the fridge for a few hours. Something about the cream and strawberries settling in together.
- If the strawberries are watery, toss them with a pinch of sugar and let them drain for 10 minutes before using. Or you’ll get a slip ‘n slide situation.
FAQ—Stuff I’ve Actually Been Asked
- Can I use frozen strawberries? Yep, just thaw and pat them dry first. Otherwise, you’ll have a soggy cake—I’ve done it and regretted it!
- Can I make this with gluten-free flour? Sure thing, just use your favorite blend. I’ve tried it—texture is slightly denser, but still delish.
- What if I don’t have cake pans? Try a casserole dish or even cupcake tins. The shape isn’t everything. (And once I did cupcakes—worked a treat!)
- How do I get my cream stiff enough? Just keep whipping until you see soft peaks. If you go too far and it gets grainy, add a splash of cold cream and gently whisk again—learned that one after a few mishaps.
- Do I need to refrigerate the whole cake? Yep, especially with fresh cream. But let it sit out for 10 minutes before serving for best flavor.
Ingredients
- 2 cups all-purpose flour (sometimes I swap in ½ cup almond flour for a little extra flavor—don’t tell my grandma)
- 1 ¼ cups granulated sugar
- 2 ½ teaspoons baking powder (I once used self-raising flour and skipped this, but it was a bit dense… your call)
- ½ teaspoon salt (kosher, regular table salt, whatever’s handy)
- ½ cup unsalted butter, softened (salted works fine if that’s all you’ve got—just dial down the extra salt)
- ¼ cup vegetable oil (or melted coconut oil for a warmer flavor, though it makes the cake ever so slightly heavier)
- 4 large eggs, room temperature—ish
- ⅔ cup whole milk (I’ve used oat milk in a pinch, turned out well!)
- 2 teaspoons vanilla extract (honestly, I eyeball it sometimes)
- 1 ½ cups fresh strawberries, hulled and chopped (frozen works, but thaw them and pat them dry first—seriously, or you’ll have strawberry soup)
- 1 cup heavy whipping cream
- 2 tablespoons powdered sugar
- Additional sliced strawberries for layering and decorating
Instructions
-
1Preheat your oven to 350°F (180°C). Grab two 8-inch round cake pans—if you’ve only got one, you can bake one layer after the other; I’ve done it more times than I can admit. Line the bottoms with parchment paper and lightly grease the sides (I just smear on some butter with my fingers).
-
2In a big ol’ bowl, whisk together the flour, sugar, baking powder, and salt. No fancy stand mixer needed here—I usually just use a trusty whisk or a wooden spoon (the one with the slightly cracked handle that I swear makes everything taste better).
-
3Add the softened butter and oil to the dry mix and blend until it’s kind of sandy and pebbly—don’t panic, it’ll come together. Stir in the eggs, milk, and vanilla until you’ve got a thick but pourable batter.
-
4Gently fold in the chopped strawberries. Try not to squish them too much—if a few get mushed, it’s absolutely fine. This is the bit where it looks a little too pink, like cartoon cake, but don’t worry—it bakes out nicely.
-
5Divide the batter between your pans (as evenly as you can eyeball, no judgment). Bake for 24–28 minutes, but start checking at 22, because my oven lies about temperatures and maybe yours does too. When a toothpick comes out with just a crumb or two, you’re golden. Let the cakes cool in the pans for 10 minutes, then turn them out onto racks to cool completely. Don’t rush this part or the cream will melt (ask me how I know).
-
6While the cakes cool, whip the cream and powdered sugar together until you’ve got soft peaks—not butter, not soup, just pleasantly cloud-like.
-
7Assembly time! Place one cake layer on your favorite plate. Pile on a generous blob of whipped cream, scatter a handful of sliced strawberries on top, then lovingly plop the second layer over that. Repeat with more cream and berries. Sometimes I sprinkle a bit of extra sugar on top if the strawberries aren’t as sweet as I’d hoped.
CLICK FOR NUTRITION INFO
↑
Approximate Information for One Serving
Serving Size:
1 serving
Calories:
375cal
Protein:
5 gg
Fat:
20 gg
Saturated Fat:
0g
Trans Fat:
0g
Cholesterol:
0mg
Sodium:
0mg
Potassium:
0mg
Total Carbs:
45 gg
Fiber:
0g
Sugar:
0g
Net Carbs:
0g
Vitamin A:
0
Vitamin C:
0mg
Calcium:
0mg
Iron:
0mg
Nutrition Disclaimers
Number of total servings shown is approximate. Actual number of servings will depend on your preferred portion sizes.
Nutritional values shown are general guidelines and reflect information for 1 serving using the ingredients listed, not including any optional ingredients. Actual macros may vary slightly depending on specific brands and types of ingredients used.
To determine the weight of one serving, prepare the recipe as instructed. Weigh the finished recipe, then divide the weight of the finished recipe (not including the weight of the container the food is in) by the desired number of servings. Result will be the weight of one serving.
Did you make this recipe?
Please consider Pinning it!