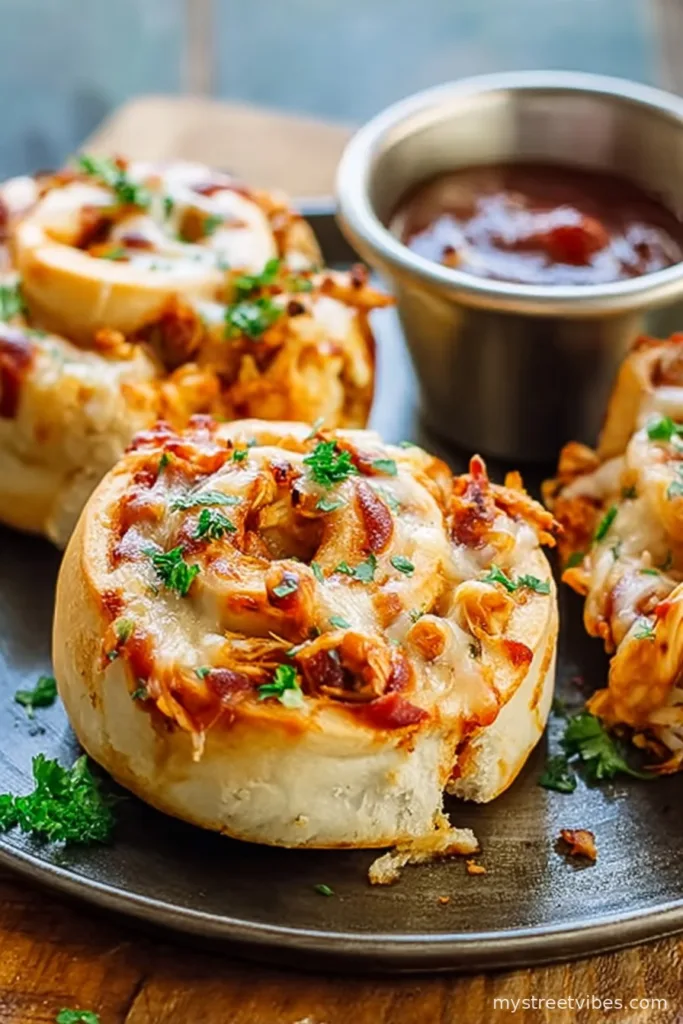
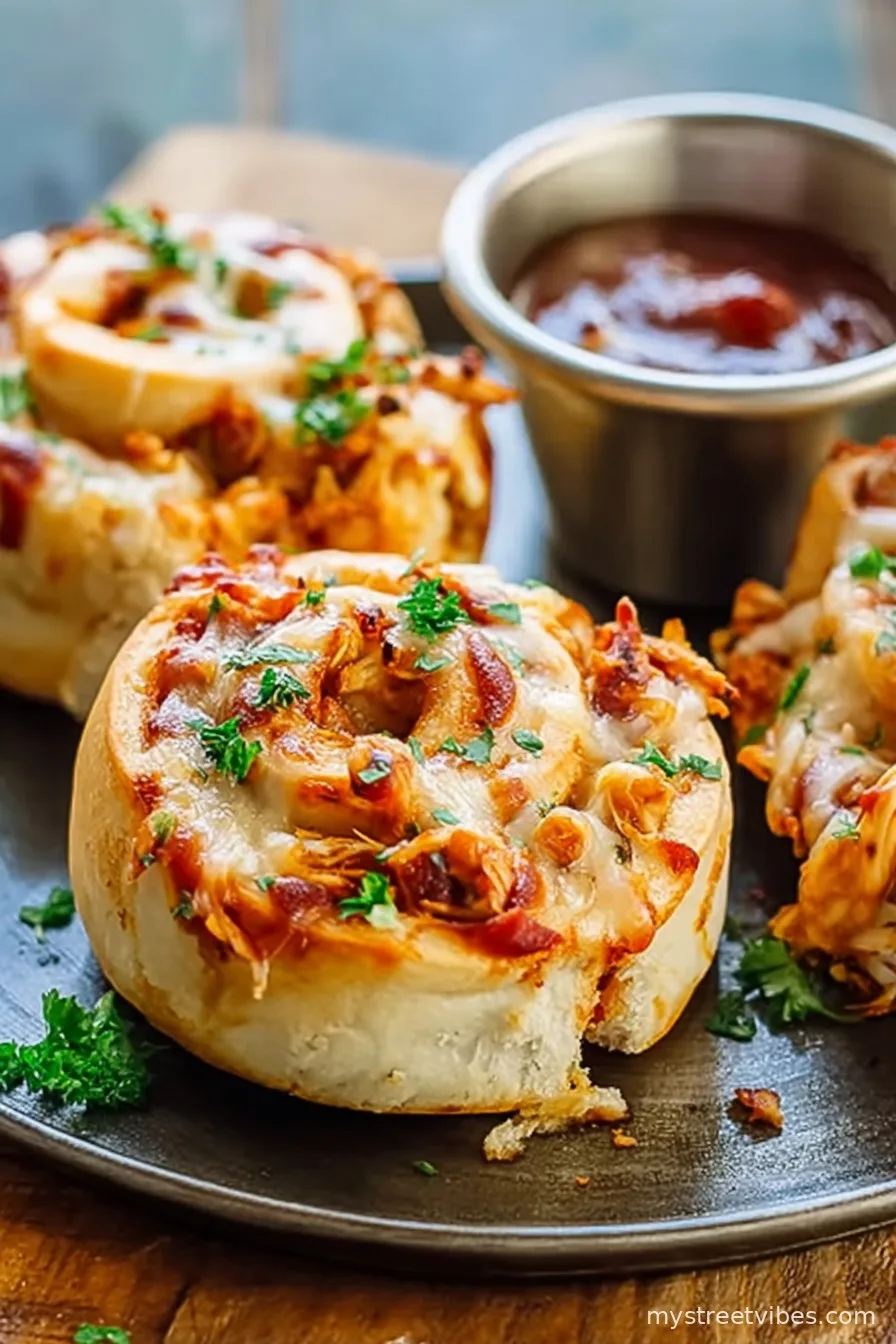
Oh, These Cheesy BBQ Chicken Pizza Rolls—Dangerously Good!
Not to sound dramatic, but these Cheesy BBQ chicken Pizza Rolls are basically what keeps my family from staging a kitchen mutiny on busy weeknights. (True story: my son once threatened to order out unless I made them.) Picture this—sweet BBQ sauce, melty mozzarella, juicy chicken, and the sort of smoky bacon that disappears straight from the counter when I turn my back. These rolls are what happens when pizza and BBQ chicken collide and have a little too much fun together. If you’ve never rolled pizza dough before, don’t stress. I’ve stuck these together at least 20 times, and even on my worst day, they’re total show-stoppers. Actually, they’re so good, I sometimes stash a couple for myself—call it chef’s tax?
Why I End Up Making These Way Too Often
I whip up a batch of these whenever the weather can’t decide if it’s summer or not, because honestly, that whole BBQ-pizza hybrid thing just hits right. My family goes bonkers for them, especially on game nights (or any night, really) and friends have straight up begged for the recipe—even my picky cousin said, “Wait, I want more of those weird pizza swirl things!” If I’m being honest, sometimes I make them just because I want leftovers for a sneaky midnight snack. And do I curse a bit when the dough springs back for the third time? Yes, but it’s worth the tiny grumble.
What You’ll Need (and What I Occasionally Swap)
- 1 pound pizza dough, fresh, frozen, or refrigerated, thawed (I’ve tried everything from artisan dough to the sad supermarket tube—let’s not be snobs here!)
- ½ cup sweet BBQ sauce, plus extra for serving (sometimes I throw in smoky sauce if I’m out of the sweet kind—turns out fine!)
- 1 ¼ cups part-skim mozzarella cheese, shredded, divided (Grandma insisted on whole milk mozz, but part-skim keeps it from becoming a cheese puddle)
- 1 cup cooked chicken, finely chopped (I usually shred a leftover rotisserie, but poached chicken works—once I even used leftover grilled thighs!)
- 3 tablespoons red onion, finely chopped (Forgot it once – honestly? Still delicious.)
- ¼ teaspoon crushed red pepper flakes (totally optional, but I dig a little kick)
- 3 slices bacon, cooked crisp, drained, and finely chopped (again, optional, and honestly sometimes disappears before I can put it in—thanks, spouse!)
- Fresh parsley leaves, chopped, for garnish (You can skip if you don’t have any. No one will riot.)
- 1 teaspoon vegetable oil for greasing the pan, plus extra for oiling the bowl
Here’s How I Roll (Literally)
- First, if you’re using frozen dough, follow the package thawing instructions, or if you grabbed refrigerated dough, just let it come to room temp in a bowl you’ve oiled up. Slap on a cover (plastic wrap or a damp towel works), give it 1–2 hours, and go do something else—like drink a coffee. No sense in watching dough, it’s as exciting as watching paint dry.
- Next, oil up your biggest round skillet or baking pan—9 or 10 inches does the trick. I like using my battered cast iron because it makes the bottoms extra crisp, but don’t stress if you haven’t got one. Set it aside, let it feel special for a minute.
- Fire up your oven to 400°F (about 200°C, for us metric types). Dust your counter with flour and roll out the dough into a rough rectangle, 18×10 inches or until it stops fighting you. (If it keeps springing back like a stubborn mule, just walk away for 5 minutes, then try again—it’ll behave eventually.) Swoosh the BBQ sauce over the dough, aiming for an even layer, but leave a little border around the edges, maybe half an inch or so. I dare you not to sneak a taste here.
- Sprinkle 1 cup of the mozzarella evenly all over, then shower with chicken, onions, and (if you’re living wild) red pepper flakes and bacon. It might look overstuffed—don’t worry, that’s basically the point.
- Here’s where the magic—or the mess—happens. Starting on the long edge, roll up the dough tightly into a fat log, tucking it (gently!) as you go. Pinch the seam at the end to seal. Now for my favorite trick: instead of hacking at it with a knife (which squishes everything), I grab some plain dental floss, shimmy it under the log, cross and pull—perfect slices every time. Chop into 8 slices.
- Arrange those slices, cut side down, into your oiled-up pan. (If they look crammed, that’s just more excuse for gooey cheese pulls later.) Slide them into the oven and bake for 25 minutes.
- Once they look golden and puffed, sprinkle the rest of the mozzarella over the rolls and bake for another 5 minutes, just long enough for the cheese to get all melty and irresistible.
- Finish with a scatter of parsley; serve hot, with extra BBQ sauce on the side for dipping. Watch how quickly they disappear—I usually burn my tongue because I can’t wait. Every. Time.

Some Real Notes From My Many “Experiments”
- Thawing dough always takes longer than I think. I once tried rushing it with the microwave—do not recommend unless you like dough rocks.
- Don’t skip oiling the pan, or you’ll end up chiseling pizza bits off like a kitchen archaeologist.
- Whole slices are amazing, but the pull-apart cheesy bits at the bottom? Absolute gold.
Ways I’ve Changed It Up (and That One Dud)
- Tried sharp cheddar with the mozz—pretty decent, but not as oozy.
- Subbed cooked turkey for chicken after Thanksgiving. A bit drier, but still tasty with extra sauce.
- I once swapped BBQ sauce for buffalo sauce. My mouth was on fire. The kids did not thank me; lesson learned.

Tools—And How I’ve Cheated Without Them
- Cast iron is grand for that crispy base, but any sturdy baking dish works, even that old round cake pan hiding in the back of your cupboard.
- No rolling pin? Wine bottles! (Just, uh, wipe it first.)
- Dental floss for slicing? Try it, you’ll thank me—no sticky mess like with a knife.
How Long Do They Keep? (Not Long Enough…)
If you’ve got leftovers, these rolls will keep in a sealed container in the fridge for 2, maybe 3 days. But really? They might not last the night—my crew tends to polish them off before they’re even cool.
Serving ’Em Up My Way
We usually eat these straight from the pan, with extra BBQ sauce in the center for dunking. Sometimes I whip up a quick green salad (when I’m feeling virtuous), but often it’s just rolls for dinner and everyone’s happy. Cold the next morning? I think they’re even better. But don’t tell the kids; they’ll beat me to it.
Pro Tips (Learned The Hard Way)
- Let the dough come to room temp. I once rushed and wrestled a cold, springy ball for fifteen minutes—never again.
- Try not to overfill the rolls. As tempting as it is, they do explode a bit if you go wild.
- If you take them out and the centers look pale, just pop back in for a few more minutes. Trust your gut more than the timer.
FAQ For My Fellow Pizza Roll Enthusiasts
- Can I use store-bought pre-cooked pizza dough? Yep, I’ve totally done that on lazy nights and nobody noticed (or maybe they were just too busy chewing).
- What about gluten-free? I’ve tried it with GF dough. It works, but you gotta be extra gentle rolling—otherwise it cracks and looks a bit tragic, but still tastes good.
- Can I prep these ahead? For sure; I’ve assembled and stashed them in the fridge (covered) the night before. Bake right before you want them—maybe add a minute or two extra to the oven time if they start cold.
- What BBQ sauce do you use? Honestly, whatever’s on sale, but I lean sweet for that classic flavor.
- Will these freeze? Technically yes, but they lose their magic when thawed and reheated. If you’re desperate though, wrap tightly and reheat in the oven, not microwave.
So there you have it—my well-loved, well-tested Cheesy BBQ Chicken Pizza Rolls. If you ever end up with leftovers, let me know how you managed it; I’m genuinely jealous!
Ingredients
- 1 pound pizza dough fresh, frozen or refrigerated, thawed
- ½ cup BBQ sauce (sweet) plus extra for serving
- 1 ¼ cups part-skim mozzarella cheese shredded, divided
- 1 cup cooked chicken finely chopped (rotisserie, poached, etc)
- 3 tablespoons red onion finely chopped
- ¼ teaspoon crushed red pepper flakes optional
- 3 slices bacon cooked crisp, drained and finely chopped (optional)
- fresh parsley leaves chopped for garnish
- 1 teaspoon vegetable oil for greasing the pan, plus more for oiling the bowl
Instructions
-
1First, if you’re using frozen dough, follow the package thawing instructions, or if you grabbed refrigerated dough, just let it come to room temp in a bowl you’ve oiled up. Slap on a cover (plastic wrap or a damp towel works), give it 1–2 hours, and go do something else—like drink a coffee. No sense in watching dough, it’s as exciting as watching paint dry.
-
2Next, oil up your biggest round skillet or baking pan—9 or 10 inches does the trick. I like using my battered cast iron because it makes the bottoms extra crisp, but don’t stress if you haven’t got one. Set it aside, let it feel special for a minute.
-
3Fire up your oven to 400°F (about 200°C, for us metric types). Dust your counter with flour and roll out the dough into a rough rectangle, 18×10 inches or until it stops fighting you. (If it keeps springing back like a stubborn mule, just walk away for 5 minutes, then try again—it’ll behave eventually.) Swoosh the BBQ sauce over the dough, aiming for an even layer, but leave a little border around the edges, maybe half an inch or so. I dare you not to sneak a taste here.
-
4Sprinkle 1 cup of the mozzarella evenly all over, then shower with chicken, onions, and (if you’re living wild) red pepper flakes and bacon. It might look overstuffed—don’t worry, that’s basically the point.
-
5Here’s where the magic—or the mess—happens. Starting on the long edge, roll up the dough tightly into a fat log, tucking it (gently!) as you go. Pinch the seam at the end to seal. Now for my favorite trick: instead of hacking at it with a knife (which squishes everything), I grab some plain dental floss, shimmy it under the log, cross and pull—perfect slices every time. Chop into 8 slices.
-
6Arrange those slices, cut side down, into your oiled-up pan. (If they look crammed, that’s just more excuse for gooey cheese pulls later.) Slide them into the oven and bake for 25 minutes.
-
7Once they look golden and puffed, sprinkle the rest of the mozzarella over the rolls and bake for another 5 minutes, just long enough for the cheese to get all melty and irresistible.
-
8Finish with a scatter of parsley; serve hot, with extra BBQ sauce on the side for dipping. Watch how quickly they disappear—I usually burn my tongue because I can’t wait. Every. Time.
CLICK FOR NUTRITION INFO
↑
Approximate Information for One Serving
Serving Size:
1 serving
Calories:
285cal
Protein:
16 gg
Fat:
10 gg
Saturated Fat:
0g
Trans Fat:
0g
Cholesterol:
0mg
Sodium:
0mg
Potassium:
0mg
Total Carbs:
34 gg
Fiber:
0g
Sugar:
0g
Net Carbs:
0g
Vitamin A:
0
Vitamin C:
0mg
Calcium:
0mg
Iron:
0mg
Nutrition Disclaimers
Number of total servings shown is approximate. Actual number of servings will depend on your preferred portion sizes.
Nutritional values shown are general guidelines and reflect information for 1 serving using the ingredients listed, not including any optional ingredients. Actual macros may vary slightly depending on specific brands and types of ingredients used.
To determine the weight of one serving, prepare the recipe as instructed. Weigh the finished recipe, then divide the weight of the finished recipe (not including the weight of the container the food is in) by the desired number of servings. Result will be the weight of one serving.
Did you make this recipe?
Please consider Pinning it!