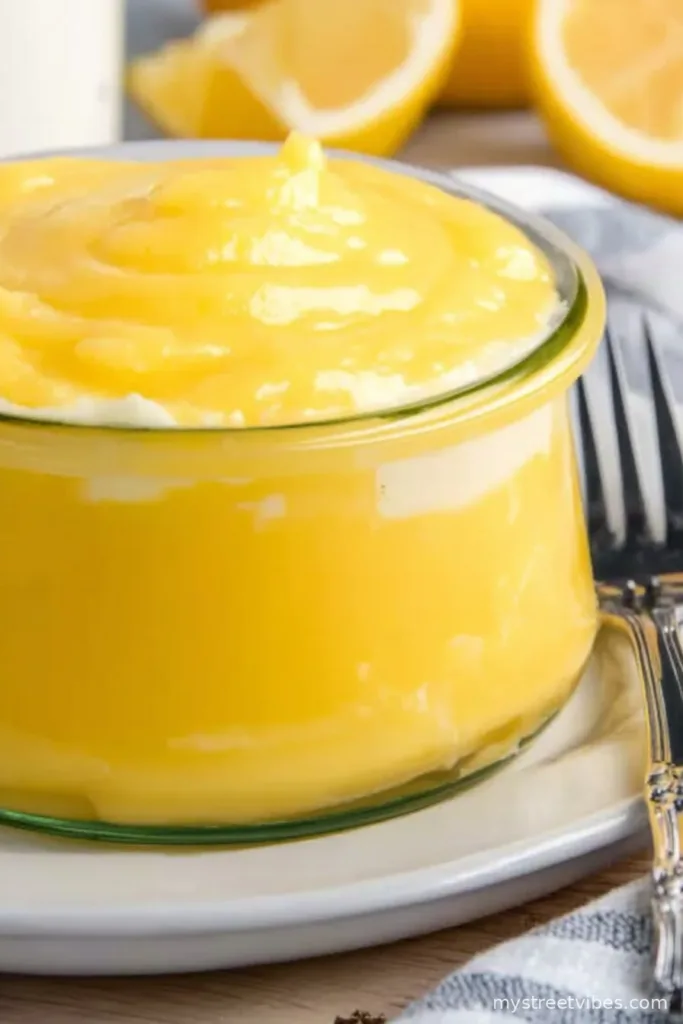
Let Me Tell You About My Classic Lemon Pie Filling Obsession
Alright, bit of a confession: when life gives me lemons, half the time they sit in the fridge until they become weird science experiments. But sometimes (especially on a rainy weekend) I get this itch to make lemon pie filling. It’s one of those recipes my mum and I used to make before we’d even bother with the crust—just standing at the stove together, impatiently waiting for it to thicken. She’d always sneak me a spoonful, so I always associate this filling with little acts of rebellion. And honestly, if there’s ever such a thing as too much lemon pie filling, I haven’t found it yet.

Why I Keep Coming Back to This Filling
I make this when the weather’s gloomy and I want to taste summer, or when I feel like showing off without doing anything too fancy. My family absolutely loses it for this stuff—my cousin once (not joking) ate it straight from the bowl, no pie in sight. I also appreciate how it’s not super fussy (though sometimes I wish there were less stirring). Oh, and you don’t need any wild ingredients. I did once try to swap out the lemons for oranges, and you know what? It was fine but…not the same magic.
Here’s What You’ll Need (Plus My Two Cents)
- 1 cup granulated sugar (Sometimes I use slightly less if my lemons are super sweet; my grandmother would say that’s sacrilege, but she’s not here so…)
- 1/4 cup cornstarch (or arrowroot if you ran out, which I did exactly last month, and it turned out fine—just a touch cloudier)
- 1/8 teaspoon salt (any kind, but honestly table salt works)
- 1 1/2 cups water (straight form the tap is what I use, fancy filtered is totally fine too)
- 1/2 cup fresh lemon juice (the real deal makes a difference; bottled juice is passable if you’re desperate—I won’t judge!)
- 2 teaspoons finely grated lemon zest (if you’re in a hurry, just do one, but I love it extra zingy)
- 3 large egg yolks, beaten (keep the whites for meringue or an omelette or, well, ignore them entirely if you’re like me most days)
- 2 tablespoons unsalted butter (salted is totally fine if that’s all you have, just skip the extra salt)
How I Actually Make It: Real Talk Directions
- Grab a medium saucepan (not too tiny, this stuff bubbles). Whisk together sugar, cornstarch, and salt right in the pan—no need to be gentle, lumps are the enemy here.
- Slowly pour in the water while whisking (if you dump it all in at once, it clumps; trust me, I’ve done this). Place the pan over medium heat and give it a solid whisk every now and then—don’t wander off.
- Once it starts gently bubbling, let it simmer for about 2 minutes. It’ll look sort of cloudy at first (I always panic here, but it clears up—promise). Then take off the heat. This is usually when I get impatient and sneak a taste.
- Now, here’s a slightly fussy step: Take a small spoonful of the hot mixture and drizzle it into the beaten egg yolks while whisking the yolks—this is called tempering, but honestly, I used to just dump it all together and ended up with lemony scrambled eggs (learned that lesson).
- Pour the egg yolk mixture back into the pan. Put the pan back on the heat for another minute or so, stirring all the while—it thickens dramatically here and turns glossy, which always feels a bit magical.
- Remove pan from heat; stir in the butter, lemon juice, and zest. The smell at this stage is so good it’ll make you sigh, or maybe that’s just me.
- Pour into a bowl—or straight into your pie crust if you’re ready. Press a bit of plastic wrap directly onto the surface to stop a skin forming (unless you love that skin, in which case… embrace it?)
- Let it cool to room temp, then chill it in the fridge for a couple hours. Unless, like in my house, everyone grabs spoons before it can even get cold.
Some Notes from My Messy Kitchen
- If your filling seems too runny at the end, it probably just needs more chill time. Or, I’ve had a dud cornstarch batch once, so maybe check yours isn’t ancient.
- If you’ve only got two lemons, add a squirt of extra zest for zip (I once used those little packets of lemon zest—tasted okay, but wasn’t quite as bright).
- I always forget to sieve out zest bits, but apparently people do that for extra smoothness. I like it rustic.
If You Fancy Changing Things Up (Or Not)
- Tried swapping half the lemon juice with lime—surprisingly zippy and fresh!
- Oranges instead of lemon: turns out too sweet for my liking, but, y’know, maybe you’ll love it.
- One time I used coconut oil instead of butter thinking I’d make it tropical…well, it was something. I’ll let you decide if that’s good or bad.

Do You Really Need Fancy Equipment?
A whisk and saucepan are (pretty much) essential, but last time my whisk went missing (thanks, kids), I used a fork. Takes a bit longer, but arms get a workout! If you don’t have a zester, a vegetable peeler works and then just chop the peel really fine.
How It Keeps (Sort Of)
You can store this in a sealed container in the fridge 3, maybe even 4 days if you’re disciplined. But, honestly, in my house, it never lasts more than a day—someone always finds it!
How I Love to Serve It (and Maybe You Will, Too)
Obviously, it’s perfect in a crispy pie shell, but I also love spooning it over plain yogurt, or let’s be honest, eating it by itself standing at the fridge. My uncle insists on dolloping whipped cream and a single raspberry on top—he calls it “fancy restaurant style” and I let him have his moment.
Pro Tips aka Mistakes I Won’t Make Again
- I once tried to rush the chilling step (put it in the freezer). Ended up half-frozen at the edges and watery in the center. Just be patient—good things do come to those who wait, turns out.
- Forgot to stir for even two minutes while answering my phone—big mistake! The bottom scorched a bit. Lesson: keep it moving and ignore the phone, at least for a minute.
Questions Folks Actually Ask Me
- Can I freeze the filling? Weird question, but someone did ask. I tried it once—texture gets a bit gloopy. I wouldn’t recommend.
- Is bottled lemon juice really okay? Look, it’s not a felony. Not quite as zingy, but honestly, it does in a pinch.
- Can I use whole eggs? Hm…tried it. Turned out too eggy for my liking (but maybe you’re into that?).
- How to make it vegan? Tricky one! I tried skipping the egg yolks and adding more cornstarch once—thickened fine, but wasn’t quite as rich. I think there are better vegan lemon curd recipes out there, but this works if you’re desperate.
- How thick should it be? Somewhere between pudding and, well, custard. It sets more as it cools, so don’t panic if it’s a bit loose just off the stove.
Now that I’m thinking about it, I feel like making another batch—just to check if it still tastes like sunshine in a bowl. Or maybe that’s just me trying to avoid cleaning the kitchen…
Ingredients
- 1 cup granulated sugar
- 1/4 cup cornstarch
- 1/8 teaspoon salt
- 1 1/2 cups water
- 1/2 cup fresh lemon juice
- 2 teaspoons finely grated lemon zest
- 3 large egg yolks, beaten
- 2 tablespoons unsalted butter
Instructions
-
1Grab a medium saucepan (not too tiny, this stuff bubbles). Whisk together sugar, cornstarch, and salt right in the pan—no need to be gentle, lumps are the enemy here.
-
2Slowly pour in the water while whisking (if you dump it all in at once, it clumps; trust me, I’ve done this). Place the pan over medium heat and give it a solid whisk every now and then—don’t wander off.
-
3Once it starts gently bubbling, let it simmer for about 2 minutes. It’ll look sort of cloudy at first (I always panic here, but it clears up—promise). Then take off the heat. This is usually when I get impatient and sneak a taste.
-
4Now, here’s a slightly fussy step: Take a small spoonful of the hot mixture and drizzle it into the beaten egg yolks while whisking the yolks—this is called tempering, but honestly, I used to just dump it all together and ended up with lemony scrambled eggs (learned that lesson).
-
5Pour the egg yolk mixture back into the pan. Put the pan back on the heat for another minute or so, stirring all the while—it thickens dramatically here and turns glossy, which always feels a bit magical.
-
6Remove pan from heat; stir in the butter, lemon juice, and zest. The smell at this stage is so good it’ll make you sigh, or maybe that’s just me.
-
7Pour into a bowl—or straight into your pie crust if you’re ready. Press a bit of plastic wrap directly onto the surface to stop a skin forming (unless you love that skin, in which case… embrace it?)
-
8Let it cool to room temp, then chill it in the fridge for a couple hours. Unless, like in my house, everyone grabs spoons before it can even get cold.
CLICK FOR NUTRITION INFO
↑
Approximate Information for One Serving
Serving Size:
1 serving
Calories:
180cal
Protein:
2 gg
Fat:
4 gg
Saturated Fat:
0g
Trans Fat:
0g
Cholesterol:
0mg
Sodium:
0mg
Potassium:
0mg
Total Carbs:
36 gg
Fiber:
0g
Sugar:
0g
Net Carbs:
0g
Vitamin A:
0
Vitamin C:
0mg
Calcium:
0mg
Iron:
0mg
Nutrition Disclaimers
Number of total servings shown is approximate. Actual number of servings will depend on your preferred portion sizes.
Nutritional values shown are general guidelines and reflect information for 1 serving using the ingredients listed, not including any optional ingredients. Actual macros may vary slightly depending on specific brands and types of ingredients used.
To determine the weight of one serving, prepare the recipe as instructed. Weigh the finished recipe, then divide the weight of the finished recipe (not including the weight of the container the food is in) by the desired number of servings. Result will be the weight of one serving.
Did you make this recipe?
Please consider Pinning it!