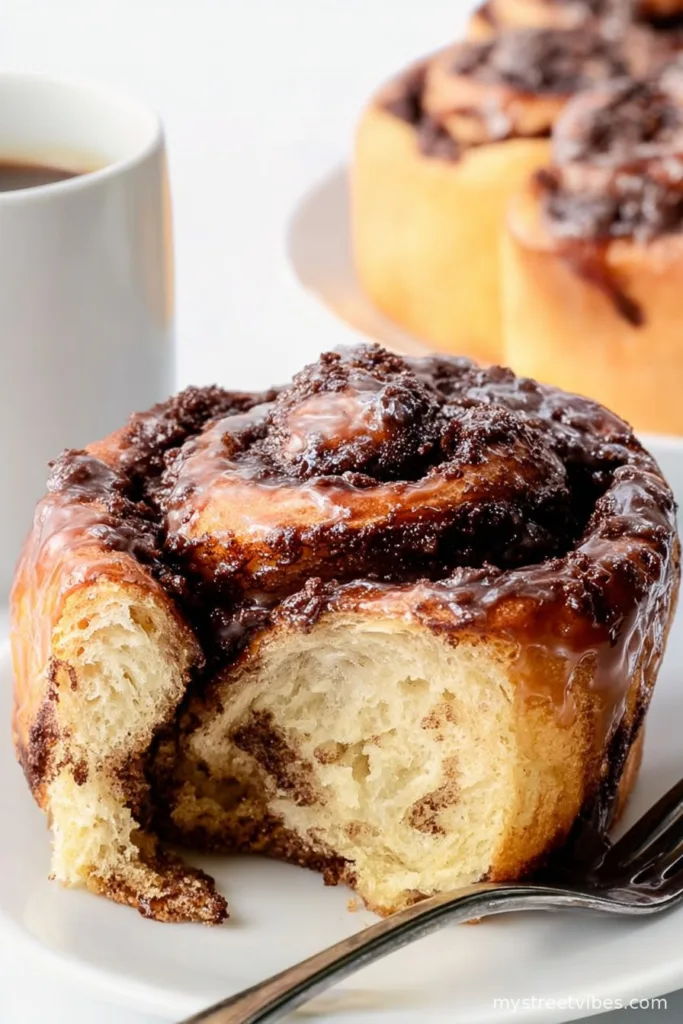
A Little Backstory (Plus Why I’m Obsessed With These Rolls)
Want to know a secret? I didn’t even like coffee until my late twenties. Then my friend handed me a chocolate espresso roll at Sunday brunch, still warm, gooey, icing running down the side—and I was a convert. Not just to coffee, but to the whole idea that breakfast can be equal parts dessert, caffeine fix, and hug from the oven. Now I bake these whenever I feel like treating myself (or, alright, maybe buttering up my family to do the dishes).
Why You’ll Fall for These Chocolate Espresso rolls
I make these when the weather gets chilly, or when I need something just a little extra for a lazy Saturday. My family basically hovers around the kitchen when that chocolatey coffee aroma starts drifting out. I mean, who can resist? Even my cousin, who always claims she “doesn’t like sweets” (sure, Jan), goes back for seconds. Plus, the dough can be a bit messy on humid days—don’t worry if it sticks; just call it “artisan.”
Let’s Talk Ingredients (and What Actually Works)
- ⅔ cup (163 g) whole milk, warmed – I’ve tried low-fat, but whole milk makes it richer. If you’re in a pinch, half-and-half works, but the texture’s a bit different.
- 5 tablespoons granulated sugar, divided – But honestly, you could swap a smidge with maple syrup (don’t tell my mother-in-law; she’s a purist).
- 2 ¼ teaspoons (1 envelope) active dry yeast – I usually buy big jars and keep ‘em in the fridge for surprise baking urges.
- 2 large eggs, room temp and beaten. Cold eggs will slow the rise, so I just soak them in warm water for 5 mins if I forget to take them out.
- ½ cup (1 stick / 113 g) unsalted butter, softened – Salted is okay if that’s what you have; just cut back on the added salt later.
- 2 cups (250 g) all-purpose flour
- 1 cup (127 g) bread flour – Don’t have bread flour? Sub another cup of all-purpose. Rolls won’t be quite as fluffy but still ace.
- 1 teaspoon kosher salt
- For the Chocolate Espresso Filling
- ½ cup (1 stick / 113 g) unsalted butter, softened—as above.
- ½ cup (100 g) light brown sugar, packed. Dark brown works too for richer flavor.
- ¼ cup heavy whipping cream
- 2 tablespoons unsweetened cocoa powder – I use whatever I grab first, but Dutch-process is delish if you have it.
- 1 tablespoon instant coffee powder – Maybe use decaf if you’re giving this to kids?
- ½ cup dark chocolate, finely chopped – I chop up whatever bar is hiding in my snack drawer.
- Espresso Icing
- ¼ cup heavy whipping cream
- 1 teaspoon instant coffee powder – More caffeine!
- 1 cup (125 g) confectioners’ sugar
- ¼ teaspoon vanilla extract, or more if you love vanilla as much as I do.
- 1 pinch kosher salt
How I Make Chocolate Espresso Rolls (Tips, Mishaps & All)
- First things first—grab your stand mixer and pop on that paddle attachment. Pour in the warmed milk (I just zap it in the microwave for about 30 seconds; sometimes I overshoot, but as long as it’s not scalding, you’re good), sprinkle over 1 tablespoon sugar, then the yeast. Stir a bit; then just leave it be for 5 minutes until it looks frothy and smells a wee bit like a brewery (in a good way!).
- Add in the eggs, softened butter, the other 4 tablespoons sugar, all-purpose flour, bread flour, and salt. Now swap the paddle for the dough hook. Start mixing on low, scraping the sides as needed—if a rogue egg tries to climb up the bowl, just shove it back in with a spatula.
- Once it’s mostly come together (it’ll be sticky), knead on medium speed. Give it about 5 minutes. You want it smooth and a tad elastic, but not stiff. I sometimes poke it with a floured finger—should bounce back slowly.
- Spray a medium bowl with nonstick spray (or just wipe with oil if you can’t find the spray)—plop your dough in, swirl it around so it gets coated, then cover with a towel or plastic wrap. I shove mine in the warmest spot I can find—sometimes the oven with the light on. Leave it until doubled in size, which for me is usually 1 to 2 hours (I grab a coffee at this stage, obviously).
- Once it’s puffed and glorious, turn the dough onto a floured surface. Dust your rolling pin (trust me, or you’ll regret it). Roll into a fairly neat 10×15 inch rectangle, about ¼-inch thick. It’s never perfect and that’s just fine—think rustic.
- On to the Filling!
- In a small bowl, mix together the softened butter, brown sugar, heavy cream, cocoa powder, and instant coffee powder. I usually make an absolute mess here—just embrace it.
- Stir in the chopped dark chocolate last. Try not to eat all the bits (I fail at this every darn time).
- Spread the luscious chocolate mixture over your rolled-out dough, right to the edges. Uneven? Nobody will care after the first bite.
- Assembly Time
- Grease a 9×9 inch baking dish with spray (or butter—use what you’ve got).
- Start on the long side and roll the dough up tightly into a log. It gets a bit wild and floppy sometimes—just keep going. Pinch the seam to seal.
- Using the sharpest knife you own (or dental floss for the brave), slice the log into 9 even rolls. Pop them, cut side up, into the prepared pan. If they look squished, don’t stress; they’ll rise and sort themselves out. Cover and let them do their puff magic for about an hour, until doubled again.
- Heat your oven to 325°F. It feels low, but trust me—they bake perfectly without burning.
- Bake rolls 35 to 40 minutes. When the tops begin to turn gold and your kitchen smells like a fancy café, you’re all set. Tempting as it is, let them cool for at least a few minutes—molten chocolate centers are real.
- The Espresso Icing
- Mix the cream and instant coffee in a small bowl, whisking until the coffee dissolves (sometimes it takes a minute). Add in confectioners’ sugar, vanilla, and a pinch of salt. Whisk until smooth, aiming for thick but drizzly. Too gloopy? Add another splash of cream. Too runny? A bit more sugar. No stress.
- Pour the icing all over your warm rolls. If you want maximum goo, do this while the rolls are still a bit warm. Give it a minute or two for the magic to happen, then dive in (with friends—or on your own, no judgement).

Some Random Notes—What I’ve Figured Out Over Time
- If your yeast doesn’t foam, it’s probably past its prime (been there!). Start over. It’s worth it.
- The dough loves a warm place to rise, but not anywhere too hot (one time I put it on a radiator and half of it cooked; not recommended).
- Icing seeps in more on day two—but who ever has leftovers?
Variations I’ve Tried (Some Flops Included)
- One time I swapped dark chocolate for milk chocolate. It was fine, just less intense—maybe go half-and-half.
- Add a handful of toasted hazelnuts to the filling for a “fancy brunch” vibe.
- I once tried making these gluten-free—I won’t even pretend it worked. Stick with regular flours here.

My Essential Equipment (and a Few Cheat Moves)
- I mean, a stand mixer makes this way easier, but if all you’ve got is a big bowl and a strong arm, that’ll work—just be ready to knead a bit longer.
- No rolling pin? A wine bottle gets the job done (don’t ask how I know).
- Sharp knife or unflavored dental floss for the slicing step—it’s a game-changer if you’re after super neat rolls. Or, just cut and call it “rustic.”
How (and If) I Ever Store Leftovers
- Technically, you can store these covered on the counter for a day or two, or in the fridge if you really have to. But, honestly, they’re always gone before sundown here.
- To reheat, a zap in the microwave for 10-15 seconds works wonders. I wouldn’t freeze after glazing, though, the icing gets weird.
Serving Suggestions Straight From My Kitchen
- Best served warm with way too much icing. Add sliced strawberries if you want to feel “healthy.”
- We always brew an extra-strong pot of coffee and put on jazz. Or 80s hair metal, depending on who’s over. No rules.
Lessons Learned (AKA My Not-So-Pro Pro Tips)
- Don’t try to shortcut the rising time—it’s never worth it. I rushed once and produced doorstops instead of rolls.
- Be generous with the filling, but stop JUST short of the very edge. Otherwise, it all oozes out when rolling. I always forget this and make a mess anyway.
- When mixing the icing, add the coffee powder into the cream before the sugar. Learned that one after a few lumps too many.
FAQ—Stuff I’m Always Asked
- Can I make these the night before? Yes! Assemble, cover, and rise in the fridge overnight; let them come to room temp for an hour in the morning before baking.
- Do I have to use bread flour? Nope, all-purpose will do in a pinch—bread flour just gives a chewier texture (which I love).
- Can I omit the coffee for kids? You can, just up the cocoa for an extra chocolate punch (but honestly, my niece loves the mild coffee taste!).
- Why did my rolls not rise? Check your yeast and don’t skip the warm spot for proofing—the dough loves cozy temps.
- Can I freeze baked rolls? Sure, just skip the icing and wrap ’em tight. Defrost and warm before adding the drizzle.
Honestly, these rolls are a bit of a labor of love, but the first bite makes every sticky finger and flour-dusted counter totally worth it. Go on—give ‘em a whirl (and send me a pic if you don’t eat them all right out of the pan!).
Ingredients
- ⅔ cup (163 g) whole milk, warmed in the microwave for about 30 seconds, or until milk is 110°-115°F
- 5 tablespoons granulated sugar, divided
- 2 ¼ teaspoons (1 envelope) active dry yeast
- 2 large eggs, room temperature, beaten
- ½ cup (1 stick / 113 g) unsalted butter, softened
- 2 cups (250 g) all-purpose flour
- 1 cup (127 g) bread flour
- 1 teaspoon kosher salt
- ½ cup (1 stick / 113 g) unsalted butter, softened
- ½ cup (100 g) light brown sugar, packed
- ¼ cup heavy whipping cream
- 2 tablespoons unsweetened cocoa powder
- 1 tablespoon instant coffee powder
- ½ cup dark chocolate, finely chopped
- ¼ cup heavy whipping cream
- 1 teaspoon instant coffee powder
- 1 cup (125 g) confectioners’ sugar
- ¼ teaspoon vanilla extract
- 1 pinch kosher salt
Instructions
-
1First things first—grab your stand mixer and pop on that paddle attachment. Pour in the warmed milk (I just zap it in the microwave for about 30 seconds; sometimes I overshoot, but as long as it’s not scalding, you’re good), sprinkle over 1 tablespoon sugar, then the yeast. Stir a bit; then just leave it be for 5 minutes until it looks frothy and smells a wee bit like a brewery (in a good way!).
-
2Add in the eggs, softened butter, the other 4 tablespoons sugar, all-purpose flour, bread flour, and salt. Now swap the paddle for the dough hook. Start mixing on low, scraping the sides as needed—if a rogue egg tries to climb up the bowl, just shove it back in with a spatula.
-
3Once it’s mostly come together (it’ll be sticky), knead on medium speed. Give it about 5 minutes. You want it smooth and a tad elastic, but not stiff. I sometimes poke it with a floured finger—should bounce back slowly.
-
4Spray a medium bowl with nonstick spray (or just wipe with oil if you can’t find the spray)—plop your dough in, swirl it around so it gets coated, then cover with a towel or plastic wrap. I shove mine in the warmest spot I can find—sometimes the oven with the light on. Leave it until doubled in size, which for me is usually 1 to 2 hours (I grab a coffee at this stage, obviously).
-
5Once it’s puffed and glorious, turn the dough onto a floured surface. Dust your rolling pin (trust me, or you’ll regret it). Roll into a fairly neat 10×15 inch rectangle, about ¼-inch thick. It’s never perfect and that’s just fine—think rustic.
-
6In a small bowl, mix together the softened butter, brown sugar, heavy cream, cocoa powder, and instant coffee powder. I usually make an absolute mess here—just embrace it.
-
7Stir in the chopped dark chocolate last. Try not to eat all the bits (I fail at this every darn time).
-
8Spread the luscious chocolate mixture over your rolled-out dough, right to the edges. Uneven? Nobody will care after the first bite.
-
9Grease a 9×9 inch baking dish with spray (or butter—use what you’ve got).
-
10Start on the long side and roll the dough up tightly into a log. It gets a bit wild and floppy sometimes—just keep going. Pinch the seam to seal.
-
11Using the sharpest knife you own (or dental floss for the brave), slice the log into 9 even rolls. Pop them, cut side up, into the prepared pan. If they look squished, don’t stress; they’ll rise and sort themselves out. Cover and let them do their puff magic for about an hour, until doubled again.
-
12Heat your oven to 325°F. It feels low, but trust me—they bake perfectly without burning.
-
13Bake rolls 35 to 40 minutes. When the tops begin to turn gold and your kitchen smells like a fancy café, you’re all set. Tempting as it is, let them cool for at least a few minutes—molten chocolate centers are real.
-
14Mix the cream and instant coffee in a small bowl, whisking until the coffee dissolves (sometimes it takes a minute). Add in confectioners’ sugar, vanilla, and a pinch of salt. Whisk until smooth, aiming for thick but drizzly. Too gloopy? Add another splash of cream. Too runny? A bit more sugar. No stress.
-
15Pour the icing all over your warm rolls. If you want maximum goo, do this while the rolls are still a bit warm. Give it a minute or two for the magic to happen, then dive in (with friends—or on your own, no judgement).
CLICK FOR NUTRITION INFO
↑
Approximate Information for One Serving
Serving Size:
1 serving
Calories:
430 caloriescal
Protein:
7 gg
Fat:
19 gg
Saturated Fat:
0g
Trans Fat:
0g
Cholesterol:
0mg
Sodium:
0mg
Potassium:
0mg
Total Carbs:
60 gg
Fiber:
0g
Sugar:
0g
Net Carbs:
0g
Vitamin A:
0
Vitamin C:
0mg
Calcium:
0mg
Iron:
0mg
Nutrition Disclaimers
Number of total servings shown is approximate. Actual number of servings will depend on your preferred portion sizes.
Nutritional values shown are general guidelines and reflect information for 1 serving using the ingredients listed, not including any optional ingredients. Actual macros may vary slightly depending on specific brands and types of ingredients used.
To determine the weight of one serving, prepare the recipe as instructed. Weigh the finished recipe, then divide the weight of the finished recipe (not including the weight of the container the food is in) by the desired number of servings. Result will be the weight of one serving.
Did you make this recipe?
Please consider Pinning it!