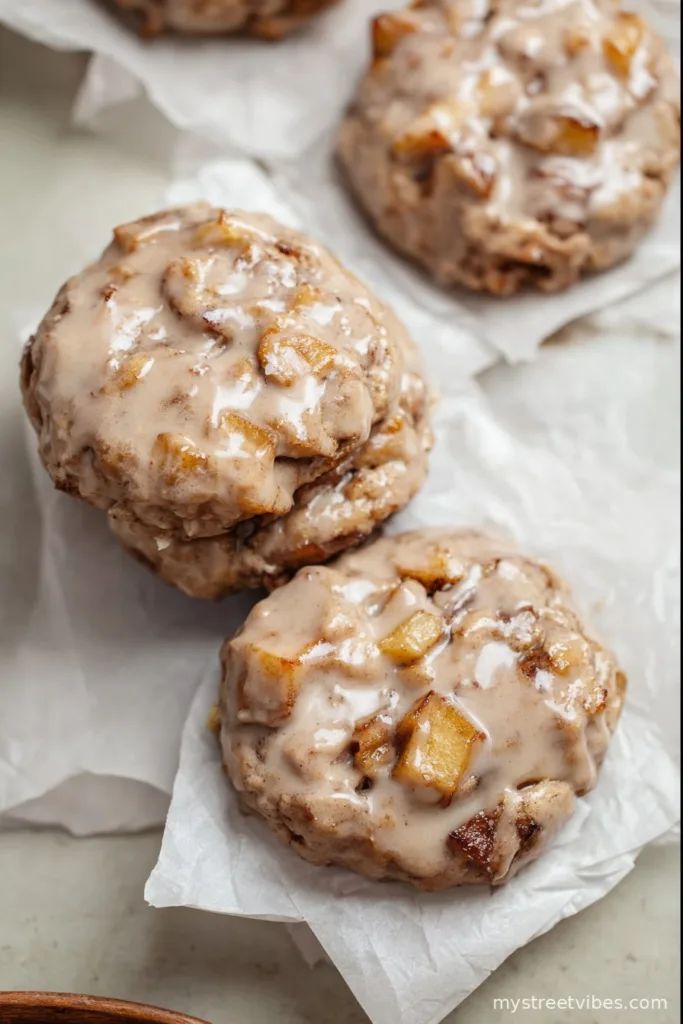
So Here’s How I Started Baking Apple Fritter Cookies
Oh wow, let me tell you—these Apple Fritter cookies have kind of become my unofficial autumn mascot. The first time I made them, it was honestly because I had a couple of apples on the verge of becoming their own science experiment, and I just didn’t feel like baking a whole pie. I remember my dad walking in, sniffing the kitchen air, and asking if I was trying to bribe the neighbors or something—because the smell is honestly that good. Look, I’ll be real, I’ve burned my fair share of cookies before, but somehow, this recipe is a soft landing, even if you’re rushing a little or (like me) can’t always get your dough in a straight line. They’re messy in a charming way, just like an actual apple fritter from a coffee shop where everything smells slightly of cinnamon and nostalgia.

Why You’ll Love This (Trust Me, My Kids Practically Wrestle for Them)
I make this when: I want dessert but don’t want to commit to a pie. My family goes crazy for this because it tastes like those big, gooey apple fritters from the corner bakery—only in cookie form, and with way less fuss. Sometimes the apples spill out the side and things get a little sticky, but you know, nobody’s actually complained about a little extra caramelized edge. Oh, and for whatever reason, they smell even better the next day (though, who honestly waits?). Side note: I once tried making them without the vanilla, and no one let me live it down.
Let’s Talk Ingredients (And What I’ve Swapped In A Pinch)
- 1 large apple, peeled and diced (I’ve used Granny Smith, but Fuji is fab too; heck, even a sad Gala works)
- 1 tablespoon unsalted butter (but in a hurry, I’ve used salted and just skipped a pinch later)
- 1 tablespoon light brown sugar (my neighbor uses dark brown but I find it a bit much)
- 1 teaspoon cinnamon (I measure by heart, but you can level it off)
- 1 and 1/2 cups all-purpose flour
- 1/2 teaspoon baking soda
- 1/4 teaspoon salt
- 1/2 cup unsalted butter, softened (I’ve even microwaved it too long and it still turned out okay, just don’t melt it entirely)
- 1/2 cup granulated sugar
- 1/4 cup packed light brown sugar
- 1 large egg (room temp if you remember, but I usually forget)
- 1 teaspoon vanilla extract (my grandmother always insisted on using vanilla paste but extract is perfectly good)
- 1/2 teaspoon apple pie spice (or just add another dash of cinnamon if you can’t be bothered)
- Optional: 1/2 cup chopped toasted pecans (if you want crunch)
- Optional: Glaze—1/2 cup powdered sugar + 2 teaspoons milk
How To Make These—A Little Bit Casual, A Little Bit Precise
- Melt a tablespoon of butter in a skillet over medium heat, then toss in your diced apple, brown sugar, and cinnamon. Stir it around for about 4-5 minutes until the apples are slightly softened and everything gets that sticky, almost caramel vibe. (If it looks weirdly wet at this point, don’t fret—it does every time. Set it aside to cool while you get the dough going.)
- Whisk together flour, baking soda, salt, and apple pie spice in a bowl. I just use a fork cause who wants extra dishes?
- Cream 1/2 cup softened butter, granulated sugar, and the other 1/4 cup brown sugar in a big mixing bowl. I use my hand mixer but if you’re feeling strong, elbow grease works too. Get it fluffy-ish, about 2-3 minutes.
- Beat in the egg and vanilla until well combined. (I always sneak a whiff here, it’s the best smell.)
- Add dry ingredients to wet; mix until just combined. Don’t overdo it. It should come together into a rough dough, not a paste.
- Fold in your cooled apple mixture and pecans if using. It’ll look chunky—totally normal.
- Scoop by heaping tablespoon onto a lined baking tray, leaving a couple inches of space. The dough’s soft, so sometimes I use two spoons, and yes, it’s okay if they look lumpy.
- Bake in a 350°F (175°C) oven for 11-13 minutes. The edges will just start to brown and the centers look slightly under; they set as they cool, promise.
- Let cool on the tray for 5 minutes (they’re fragile when hot!), then move to a wire rack. If you want, whisk the glaze and drizzle over once cookies are cool—my cousin drizzles before they cool, but then it runs off, so up to you.

What I’ve Learned (The Hard Way, Naturally)
- If your apples are juicy, pat them dry a bit after sautéing—yep, I once had cookies that spread so much they fused into one gigantic ‘fritter tile’
- Bake in small batches—overcrowding the tray makes them steam and stick together (ask me how I know…)
- Actually, I find the cookies taste even more apple-y the next morning, though rarely make it to sunrise in my house
- Parchment paper = superhero for sticky cookies, but I’ve used a buttered tray in a pinch
Variations I’ve Tried (and One I Regret)
- Chopped pears work instead of apples; a little mushier, but still yum
- A teeny handful of chopped dried cranberries for tang (the kids picked them out though)
- Once, I grated the apple for a smoother dough—wasn’t my favorite, honestly, too wet and lost the fritter vibe
- With a hint of nutmeg or cardamom—kinda fun if you’re in the mood for spice

What If I Don’t Own Every Gadget Under the Sun?
You technically need a cookie sheet, but once, when my tray went missing (don’t ask), I used a pizza pan lined with foil and just cut the baking time by a minute—worked fine, just a bit less crispy round the edges.
Keeping Them Fresh (As If)
Store in an airtight container at room temp, up to 3 days. If you made the glaze, pop a bit of parchment between layers to save yourself the heartbreak of cookies merging. But honestly, they’re always gone in a day around here. If by some miracle you have leftovers, they’ve still got oomph on day two—actually, kinda great with morning coffee.
How I Like To Serve ‘Em
We usually eat these still just a little warm, with a mug of milky tea. It’s also become this slightly odd tradition to split one in half and judge who got the most apple bits. For parties, I stack ‘em up on a big plate and sort of watch them vanish over the first hour.
Pro Tips (AKA How Not To Repeat My Mistakes)
- Don’t rush creaming the butter and sugars—it really makes the texture. I tried cutting corners once… regret.
- Always let the apples cool before adding or you’ll have a sticky, half-cooked mess that sticks to your spoon (sorry, learned that one the hard way)
- If your oven runs hot, check in at 10 minutes instead—burnt bottoms are usually just a sign of impatience, not culinary bravery
FAQ—Real Questions I Get (and Sometimes, a Side Note or Two)
- Can I freeze these cookies? Sure thing. Freeze them baked or unbaked (cookie dough balls, that is). Though honestly, leftover baked cookies are rare in my place! Just thaw at room temp, maybe zap in the microwave for a sec.
- Is it okay to skip the nuts? Absolutely. My youngest would stage a protest if nuts snuck in, tbh—I often leave ‘em out entirely.
- What if I don’t have apple pie spice? No worries! Just bump up the cinnamon and maybe add a soft whisper of nutmeg or cloves if you like.
- Can I double the recipe? Yes, but bake in batches! I once crowded the oven and got some half-raw, half-burnt situations. Live and learn.
By the way, speaking of apples, did you know you can actually use them to ripen avocados faster? Just toss ’em in a paper bag together. Not at all related to cookies, but somehow this always slips out when I’m talking about apples. Anyway—hope you love these messy, gorgeous Apple Fritter Cookies as much as we do!
Ingredients
- 1 large apple, peeled and diced (I’ve used Granny Smith, but Fuji is fab too; heck, even a sad Gala works)
- 1 tablespoon unsalted butter (but in a hurry, I’ve used salted and just skipped a pinch later)
- 1 tablespoon light brown sugar (my neighbor uses dark brown but I find it a bit much)
- 1 teaspoon cinnamon (I measure by heart, but you can level it off)
- 1 and 1/2 cups all-purpose flour
- 1/2 teaspoon baking soda
- 1/4 teaspoon salt
- 1/2 cup unsalted butter, softened (I’ve even microwaved it too long and it still turned out okay, just don’t melt it entirely)
- 1/2 cup granulated sugar
- 1/4 cup packed light brown sugar
- 1 large egg (room temp if you remember, but I usually forget)
- 1 teaspoon vanilla extract (my grandmother always insisted on using vanilla paste but extract is perfectly good)
- 1/2 teaspoon apple pie spice (or just add another dash of cinnamon if you can’t be bothered)
- Optional: 1/2 cup chopped toasted pecans (if you want crunch)
- Optional: Glaze—1/2 cup powdered sugar + 2 teaspoons milk
Instructions
-
1Melt a tablespoon of butter in a skillet over medium heat, then toss in your diced apple, brown sugar, and cinnamon. Stir it around for about 4-5 minutes until the apples are slightly softened and everything gets that sticky, almost caramel vibe. (If it looks weirdly wet at this point, don’t fret—it does every time. Set it aside to cool while you get the dough going.)
-
2Whisk together flour, baking soda, salt, and apple pie spice in a bowl. I just use a fork cause who wants extra dishes?
-
3Cream 1/2 cup softened butter, granulated sugar, and the other 1/4 cup brown sugar in a big mixing bowl. I use my hand mixer but if you’re feeling strong, elbow grease works too. Get it fluffy-ish, about 2-3 minutes.
-
4Beat in the egg and vanilla until well combined. (I always sneak a whiff here, it’s the best smell.)
-
5Add dry ingredients to wet; mix until just combined. Don’t overdo it. It should come together into a rough dough, not a paste.
-
6Fold in your cooled apple mixture and pecans if using. It’ll look chunky—totally normal.
-
7Scoop by heaping tablespoon onto a lined baking tray, leaving a couple inches of space. The dough’s soft, so sometimes I use two spoons, and yes, it’s okay if they look lumpy.
-
8Bake in a 350°F (175°C) oven for 11-13 minutes. The edges will just start to brown and the centers look slightly under; they set as they cool, promise.
-
9Let cool on the tray for 5 minutes (they’re fragile when hot!), then move to a wire rack. If you want, whisk the glaze and drizzle over once cookies are cool—my cousin drizzles before they cool, but then it runs off, so up to you.
CLICK FOR NUTRITION INFO
↑
Approximate Information for One Serving
Serving Size:
1 serving
Calories:
140 caloriescal
Protein:
2gg
Fat:
6gg
Saturated Fat:
0g
Trans Fat:
0g
Cholesterol:
0mg
Sodium:
0mg
Potassium:
0mg
Total Carbs:
22gg
Fiber:
0g
Sugar:
0g
Net Carbs:
0g
Vitamin A:
0
Vitamin C:
0mg
Calcium:
0mg
Iron:
0mg
Nutrition Disclaimers
Number of total servings shown is approximate. Actual number of servings will depend on your preferred portion sizes.
Nutritional values shown are general guidelines and reflect information for 1 serving using the ingredients listed, not including any optional ingredients. Actual macros may vary slightly depending on specific brands and types of ingredients used.
To determine the weight of one serving, prepare the recipe as instructed. Weigh the finished recipe, then divide the weight of the finished recipe (not including the weight of the container the food is in) by the desired number of servings. Result will be the weight of one serving.
Did you make this recipe?
Please consider Pinning it!