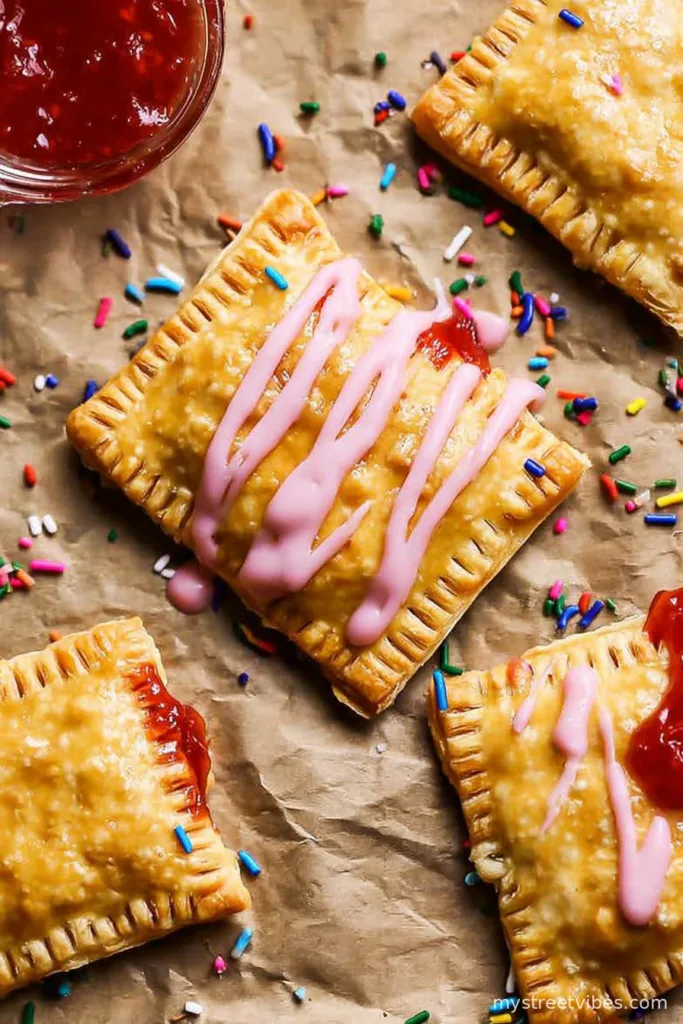
Poptarts That Remind Me of Saturday Cartoons
Okay, so let me tell you — the first time I made homemade pop tarts with pie crust, I was chasing this wild nostalgia for Saturday mornings at my grandma’s, sparkly pink icing clinging to my fingers while Scooby Doo did his thing on TV. Now, for a while, I thought making pop tarts from scratch was a Project (with a capital P), but then I realized, hang on a tick, store-bought pie crust solves basically 98% of the bother. So here we are: pop tarts that are flaky, jam-packed (sometimes literally), and waaaay better than I remembered. Don’t ask me how many I’ve eaten in one sitting; let’s just say I’ve tested all the filling ratios for you (purely scientific, obviously).

Why I Keep Making These (And You Might, Too…)
I bake these pop tarts whenever that sweet tooth hits, but I haven’t got the patience for anything fiddly. My family goes slightly bonkers for the strawberry ones; the only complaint ever is when they’re gone too fast. (Honestly, the messier the edges, the better they taste—I’ve done extensive ‘research,’ which is just code for me eating the weird-looking ones first.) Oh, and if the crust cracks a little? Eh, that’s charm, not a problem.
What You’ll Need (With My Substitution Sagas)
- 2 sheets refrigerated pie crust (the round kind; I sometimes use frozen, thawed, or my friend swears by her favorite from Trader Nad’s, but any will do)
- 2/3 cup fruit jam or preserves (strawberry’s my go-to, but I’ve used cherry and that last half-jar of apricot—a wild card!)
- 1 cup powdered sugar
- 2–3 tbsp milk (sometimes I use half-and-half when I can’t find milk, and it’s perfectly fine)
- 1 tbsp butter, melted
- 1 egg, beaten (for egg wash, though I did skip it once and they still browned up…sort of)
- Sprinkles! (Optional, but my nephew would revolt if I skipped them)
How I Pull These Together
- First, preheat your oven to 375°F (190°C). This gives you a legit excuse to ignore your phone for a few minutes while things warm up.
- Roll out your pie crusts on a lightly floured surface. If they’re wonky, just patch ’em together. Cut each into rectangles, about the size of your phone or, you know, Pop Tart-sized. You’ll get 6-8 total, unless you’re feeling extra generous with sizes.
- Spoon about a tablespoon of jam onto half the rectangles, leaving a thumb-width border. I always overestimate and sometimes the filling oozes out—good times!
- Brush the edges (the borders) with beaten egg. Not too fussy here—think, “Hmm, that’ll probably stick.” Place a second rectangle of crust over each jammy one. Press the edges down with a fork; bonus points if the crimps look cute.
- Place assembled pop tarts on a parchment-lined baking sheet. Poke a few holes in the tops with a fork so they don’t explode, unless you’re aiming for that Jackson Pollock effect (I won’t judge).
- Brush the tops with the remaining egg wash. Slide into the oven for about 20–22 minutes. They should go golden, but sometimes the edges get a bit “done” while the centers stay pale. It’s not a disaster.
- Let them cool on a wire rack for at least 15 minutes. And yes, they smell amazing at this point, but molten jam is savage stuff—ask my tongue.
- Mix the powdered sugar with melted butter, and add milk, a little splash at a time, whisking till it’s just spreadable. Glaze each tart. If you want to toss on sprinkles, do it now, or forever hold your peace.

Notes from My Not-So-Perfect Kitchen
- Pie crust tends to protest if it’s too cold. Let it sit on the counter for a bit so it unrolls without cracking. (Just not all day or you’ll have a sticky mess.)
- If you’re out of jam, honestly, a slather of Nutella or even peanut butter and honey works. I discovered this at midnight and now I can’t stop.
- If your rectangles come out a bit ‘unique’ in shape, embrace it. Rustic chic, I say.
Wild Variations (and Goofs I’ve Made)
- Nutella and banana—delicious, but very slippery filling. Have napkins handy.
- Biscoff/Lotus cookie butter with a dusting of cinnamon sugar—over the top, but in a good way.
- Don’t try filling with fresh berries unless you also add some cornstarch (otherwise: Soup City).

If You’re Missing a Fancy Tool
I use a rolling pin, but honestly, a sturdy drinking glass or even a wine bottle gets the job done in a pinch. One time I couldn’t find my pastry brush and just used my (clean!) fingers for the egg wash. Worked great.
How Long Do They Last? Well…About That
You can keep these pop tarts in an airtight container at room temp for up to 3 days. They actually taste even better the next morning (when the glaze sort of settles), but honestly, they never last more than a day around here. Fridge works too, especially for the chocolate-filled ones.
How I Love to Eat These
Morning, straight out of the toaster oven, with coffee and maybe some Greek yogurt so I can pretend it’s breakfast food. For birthdays, we’ve been known to pile them up on a cake stand and stick candles in them. My cousin likes his with a scoop of vanilla ice cream. The sky’s the limit, really.
Hard-Earned Pop Tart Wisdom (So You Don’t Repeat My Blunders)
- Don’t rush the cooling! Once, I tried to eat one straight from the pan—jam lava. Big mistake.
- If you skip the egg wash, things will still work, but the color’s a bit “meh.”
- Cut small vents on top. If you forget, you might get jam geysers (the dog really enjoyed that cleanup, though).
Questions I Actually Get Asked About These
- Do I really need to use pie crust, or can I try puff pastry? I’ve tried puff—it goes super flaky, but the tarts sort of explode open every time. Pie crust is more predictable.
- Can I freeze these? Yep! I wrap mine in clingfilm and freeze them unglazed. Thaw at room temp, toast, then glaze. They’re maybe even better after a freeze, weirdly.
- Egg allergy—skip the wash? Just brush the edges with milk, works nearly as well for sealing. Color’s not as golden, but small price to pay.
- Why did my pop tarts burst? Happens to the best of us! Most times it’s overfilling or forgetting the fork vents. Still tasty, though a little less Instagram-friendly.
If you read this far, I admire your patience—mine’s about done, so off I go to sneak another tart before anyone notices. Happy bakin’!
Ingredients
- 2 sheets refrigerated pie crust (the round kind; I sometimes use frozen, thawed, or my friend swears by her favorite from Trader Nad’s, but any will do)
- 2/3 cup fruit jam or preserves (strawberry’s my go-to, but I’ve used cherry and that last half-jar of apricot—a wild card!)
- 1 cup powdered sugar
- 2–3 tbsp milk (sometimes I use half-and-half when I can’t find milk, and it’s perfectly fine)
- 1 tbsp butter, melted
- 1 egg, beaten (for egg wash, though I did skip it once and they still browned up…sort of)
- Sprinkles! (Optional, but my nephew would revolt if I skipped them)
Instructions
-
1First, preheat your oven to 375°F (190°C). This gives you a legit excuse to ignore your phone for a few minutes while things warm up.
-
2Roll out your pie crusts on a lightly floured surface. If they’re wonky, just patch ’em together. Cut each into rectangles, about the size of your phone or, you know, Pop Tart-sized. You’ll get 6-8 total, unless you’re feeling extra generous with sizes.
-
3Spoon about a tablespoon of jam onto half the rectangles, leaving a thumb-width border. I always overestimate and sometimes the filling oozes out—good times!
-
4Brush the edges (the borders) with beaten egg. Not too fussy here—think, “Hmm, that’ll probably stick.” Place a second rectangle of crust over each jammy one. Press the edges down with a fork; bonus points if the crimps look cute.
-
5Place assembled pop tarts on a parchment-lined baking sheet. Poke a few holes in the tops with a fork so they don’t explode, unless you’re aiming for that Jackson Pollock effect (I won’t judge).
-
6Brush the tops with the remaining egg wash. Slide into the oven for about 20–22 minutes. They should go golden, but sometimes the edges get a bit “done” while the centers stay pale. It’s not a disaster.
-
7Let them cool on a wire rack for at least 15 minutes. And yes, they smell amazing at this point, but molten jam is savage stuff—ask my tongue.
-
8Mix the powdered sugar with melted butter, and add milk, a little splash at a time, whisking till it’s just spreadable. Glaze each tart. If you want to toss on sprinkles, do it now, or forever hold your peace.
CLICK FOR NUTRITION INFO
↑
Approximate Information for One Serving
Serving Size:
1 serving
Calories:
290 caloriescal
Protein:
3gg
Fat:
12gg
Saturated Fat:
0g
Trans Fat:
0g
Cholesterol:
0mg
Sodium:
0mg
Potassium:
0mg
Total Carbs:
41gg
Fiber:
0g
Sugar:
0g
Net Carbs:
0g
Vitamin A:
0
Vitamin C:
0mg
Calcium:
0mg
Iron:
0mg
Nutrition Disclaimers
Number of total servings shown is approximate. Actual number of servings will depend on your preferred portion sizes.
Nutritional values shown are general guidelines and reflect information for 1 serving using the ingredients listed, not including any optional ingredients. Actual macros may vary slightly depending on specific brands and types of ingredients used.
To determine the weight of one serving, prepare the recipe as instructed. Weigh the finished recipe, then divide the weight of the finished recipe (not including the weight of the container the food is in) by the desired number of servings. Result will be the weight of one serving.
Did you make this recipe?
Please consider Pinning it!