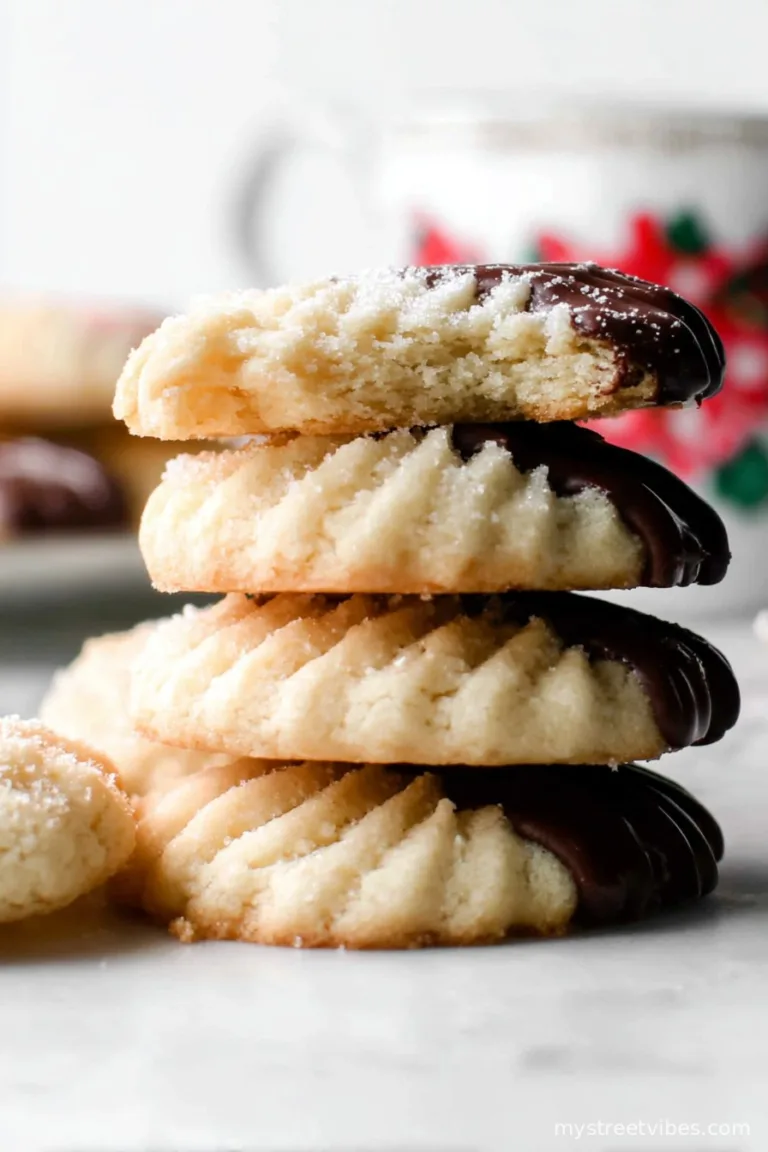
Pull Up a Chair: Let’s Talk Christmas Whipped Shortbread
If you’ve ever found yourself panic-baking on Christmas Eve (guilty), you know the feeling of craving that one cookie that just vanishes off the plate before dinner is even served. For me, and pretty much everyone in my family, Christmas Whipped Shortbread Cookies are that cookie. Actually, my Aunt Sheila used to hide a stash of these behind the flour jar, and I only found out when I was tall enough to peek (too late!). Anyway, making these is less about perfection, more about good laughs, flour everywhere, and the butteriest bites you can imagine. And here’s a truth—don’t wear black while making these unless you want a festive dusting of powdered sugar all over you. But that’s half the fun, right?
Why You’ll Love These (Or Why I Keep Making Them…)
I make these whenever the first snow comes down—mainly because I’m impatient and can’t wait for the actual holidays. My crew basically hovers in the kitchen, waiting for that first batch to cool… which, let’s be honest, never happens. Even my neighbor Frank (the one with the yappy dog) asks for a tin every year! I tried skipping the sprinkles once—big mistake. So if you like a cookie that’s light as air but somehow rich too, I can’t recommend these enough. And if you’ve ever had a baking fail (who hasn’t?), these are surprisingly forgiving, as long as you don’t skimp on the creaming step. I learned that the hard way, haha.
What You’ll Need (And What My Gran Used to Swear By)
- 1 cup (just over 225g) unsalted butter, at room temp (some diehards insist on salted, but I find unsalted gives you more control; also, no big deal if you use a tiny bit more—measuring isn’t an exact science here)
- 1/2 cup icing sugar (confectioners’ sugar, and yes, I’ve cheated with regular sugar once or twice. It’s… not the same but still edible!)
- 1 1/2 cups all-purpose flour (My gran always used Robin Hood flour but, honestly, store brand is fine)
- 1/4 cup cornstarch (Don’t have it? Just use more flour, but the cookies might not be quite as light. Still good though.)
- Pinch of salt if your butter is unsalted
- Sprinkles, cherries, or even chocolate chips for topping—whatever feels right!
Here’s How I Make ‘Em
- Preheat the oven to 300°F (about 150°C). Honestly, don’t crank it any higher. These are more about a gentle bake than a sprint to the finish.
- Cream the butter like you mean it. Get your electric mixer out and go wild—at least 3 to 5 minutes, till it’s pale and fluffy and you’re questioning if you overdid it. (You probably didn’t. In fact, more is better here. This is when I might sneak a taste, quality control and all!)
- Add icing sugar and whip again till combined. It’ll look deliciously wrong, sort of like frosting gone lumpy. Trust me.
- Toss in flour, cornstarch, and salt. Slowly. Mix till just combined—don’t over-mix at this stage or they get tough (been there, regretted it). If it looks dry, you can squish it together a bit with your hands. Slight messiness is expected.
- Now, drop spoonfuls on a lined baking sheet. Or get fancy and pipe them, but I never bother. (A fork gently pressed on top makes a nice, classic pattern. Or the bottom of a glass, if you’re low on forks—no judgment.)
- Add toppings. Red and green sprinkles? A half cherry? Or sometimes I use mini chocolate chips, but then my kids get into a civil war over who got more chocolate.
- Bake 22–28 minutes. Keep an eye out: you want pale, not golden. These aren’t sugar cookies. If the edges start coloring, just take them out anyway—they’re probably fine. Cool on the tray for a bit, they’re fragile when hot!
A Few Notes from Experience (Because I’ve Learned…)
- The dough can look way too soft but firms up when baked. Don’t be tempted to add more flour unless you really can’t scoop it.
- Actually, I find they taste better the next day, but good luck making them last that long.
- If your butter’s too cold, let it sit near the oven while it preheats. (Microwaving butter usually ends in regret, at least for me.)
Variations I’ve Tried (And a Flop)
- Once I tossed in some lemon zest—really fresh, almost like a spring version.
- Swapped out part of the flour for almond flour one year. Good flavor, crumbly texture. Not a crowd favorite, but I liked it.
- Tried rolling them in crushed peppermint—messy, and sort of weird. Not recommended unless you like eating candy canes in cookie form, which I apparently do not!
Essential-ish Equipment (But Not Really)
- Electric mixer: I think it’s worth it, but you really can get away with a strong arm and a big wooden spoon (plus a bit of elbow grease and a good playlist).
- Baking sheet + parchment paper: If you don’t have parchment, a lightly greased pan will do. Or just grab a silicone mat—have you seen this comparison? Honestly, I just use whatever’s not in the dishwasher.

How I (Try to) Store Shortbread
Theoretically, these last in an airtight container for about a week. Maybe two, if you hide them well. But in my house? No chance, they’re usually gone by the next morning or, if some elusive Christmas magic happens, two days max. If you’re really organized, you could freeze them for up to a month—just layer with wax paper. But that’s a big ‘if’…
Serving Ideas That Make Me Smile
I always pile these awkwardly high on my grandma’s old cake stand (she’d approve). Try them with coffee, tea, or—my favorite—hot chocolate with way too many marshmallows. Sometimes I put them in cute little gift bags; there’s a whole world of adorable packaging on A Beautiful Mess, if you’re into that sort of thing. Or honestly, just eat ’em straight up, standing in the kitchen in your fuzzy socks. That’s tradition too.
Pro Tips (AKA What Not to Do, Learned the Hard Way)
- Don’t rush the butter-creaming step; I once tried to hurry it (so the cookies would be out before school pick-up), and they turned out dense. Sad, but educational.
- If you overbake, they just taste like… flour. Set a timer, but check early. On second thought, start peeking at 20 minutes if your oven runs hot.
Real Questions I’ve Gotten (And My Not-Always-Straight Answers)
- Q: Can I use margarine?
A: Uh, you can, but honestly, the flavor isn’t the same. Butter is the hero here. If dairy’s out, try a fancy vegan butter—I’ve heard good things, but haven’t tested it myself. - Q: Do I need to chill the dough?
A: Nope! The beauty of these is that you whip it, you drop it, you bake it. No fridge time unless your kitchen is Sahara-level hot, then maybe chill for a little to avoid spreading. - Q: Can I double the recipe?
A: Yes and—go for it! But use a bigger bowl than you think, unless you want a flurry of flour all over your counter (I mean, it’s festive. But also a pain to clean). - Q: Can I freeze the dough?
A: Sure thing, just thaw in the fridge before baking. Scoop the dough onto trays beforehand for easy peasy baking later—you’ll thank me come December 23rd!
And not to ramble, but if you haven’t checked out Sally’s classic whipped shortbread, her troubleshooting tips are ace. Just saying!
If you give these a whirl, let me know how it goes—or if the batch vanishes before you can share. Happens in the best of kitchens. Merry baking!

Ingredients
- 1 cup (225g) unsalted butter, softened
- 1/2 cup (65g) powdered sugar
- 1 1/2 cups (180g) all-purpose flour
- 1/4 cup (40g) cornstarch
- 1/2 tsp vanilla extract
- 1/4 tsp salt
- Festive sprinkles or candied cherries (for decorating)
Instructions
-
1Preheat the oven to 300°F (150°C) and line two baking sheets with parchment paper.
-
2In a large bowl, beat the softened butter until light and fluffy, about 2-3 minutes.
-
3Add powdered sugar and vanilla extract, and beat until combined and creamy.
-
4Sift in the all-purpose flour, cornstarch, and salt. Mix on low speed until a soft, airy dough forms.
-
5Using a small cookie scoop or spoon, drop small mounds of dough onto prepared baking sheets, spacing them about 2 inches apart. Decorate with festive sprinkles or press a candied cherry on top of each cookie.
-
6Bake for 16-18 minutes or until the cookies are just set and the edges are pale golden. Cool on the baking sheet for 5 minutes, then transfer to a wire rack to cool completely.
CLICK FOR NUTRITION INFO
↑
Approximate Information for One Serving
Serving Size:
1 serving
Calories:
90cal
Protein:
1 gg
Fat:
6 gg
Saturated Fat:
0g
Trans Fat:
0g
Cholesterol:
0mg
Sodium:
0mg
Potassium:
0mg
Total Carbs:
9 gg
Fiber:
0g
Sugar:
0g
Net Carbs:
0g
Vitamin A:
0
Vitamin C:
0mg
Calcium:
0mg
Iron:
0mg
Nutrition Disclaimers
Number of total servings shown is approximate. Actual number of servings will depend on your preferred portion sizes.
Nutritional values shown are general guidelines and reflect information for 1 serving using the ingredients listed, not including any optional ingredients. Actual macros may vary slightly depending on specific brands and types of ingredients used.
To determine the weight of one serving, prepare the recipe as instructed. Weigh the finished recipe, then divide the weight of the finished recipe (not including the weight of the container the food is in) by the desired number of servings. Result will be the weight of one serving.
Did you make this recipe?
Please consider Pinning it!!